Plesk User Guide
For Plesk plugin troubleshooting, refer to Plesk Plugin FAQs.
Plesk can be used by two types of user:
- Hosting providers
- Domain owners/admins
Using the Blackwall Extension - Hosting Providers
- Log in to your Plesk account and in the left sidebar, click Blackwall Protection. This sidebar link appears automatically following installation of the extension in admin accounts. Alternatively, from the left sidebar, click Extensions, then My Extensions tab, scroll the listed extensions until you find the newly added Blackwall extension, and finally click the Blackwall extension.
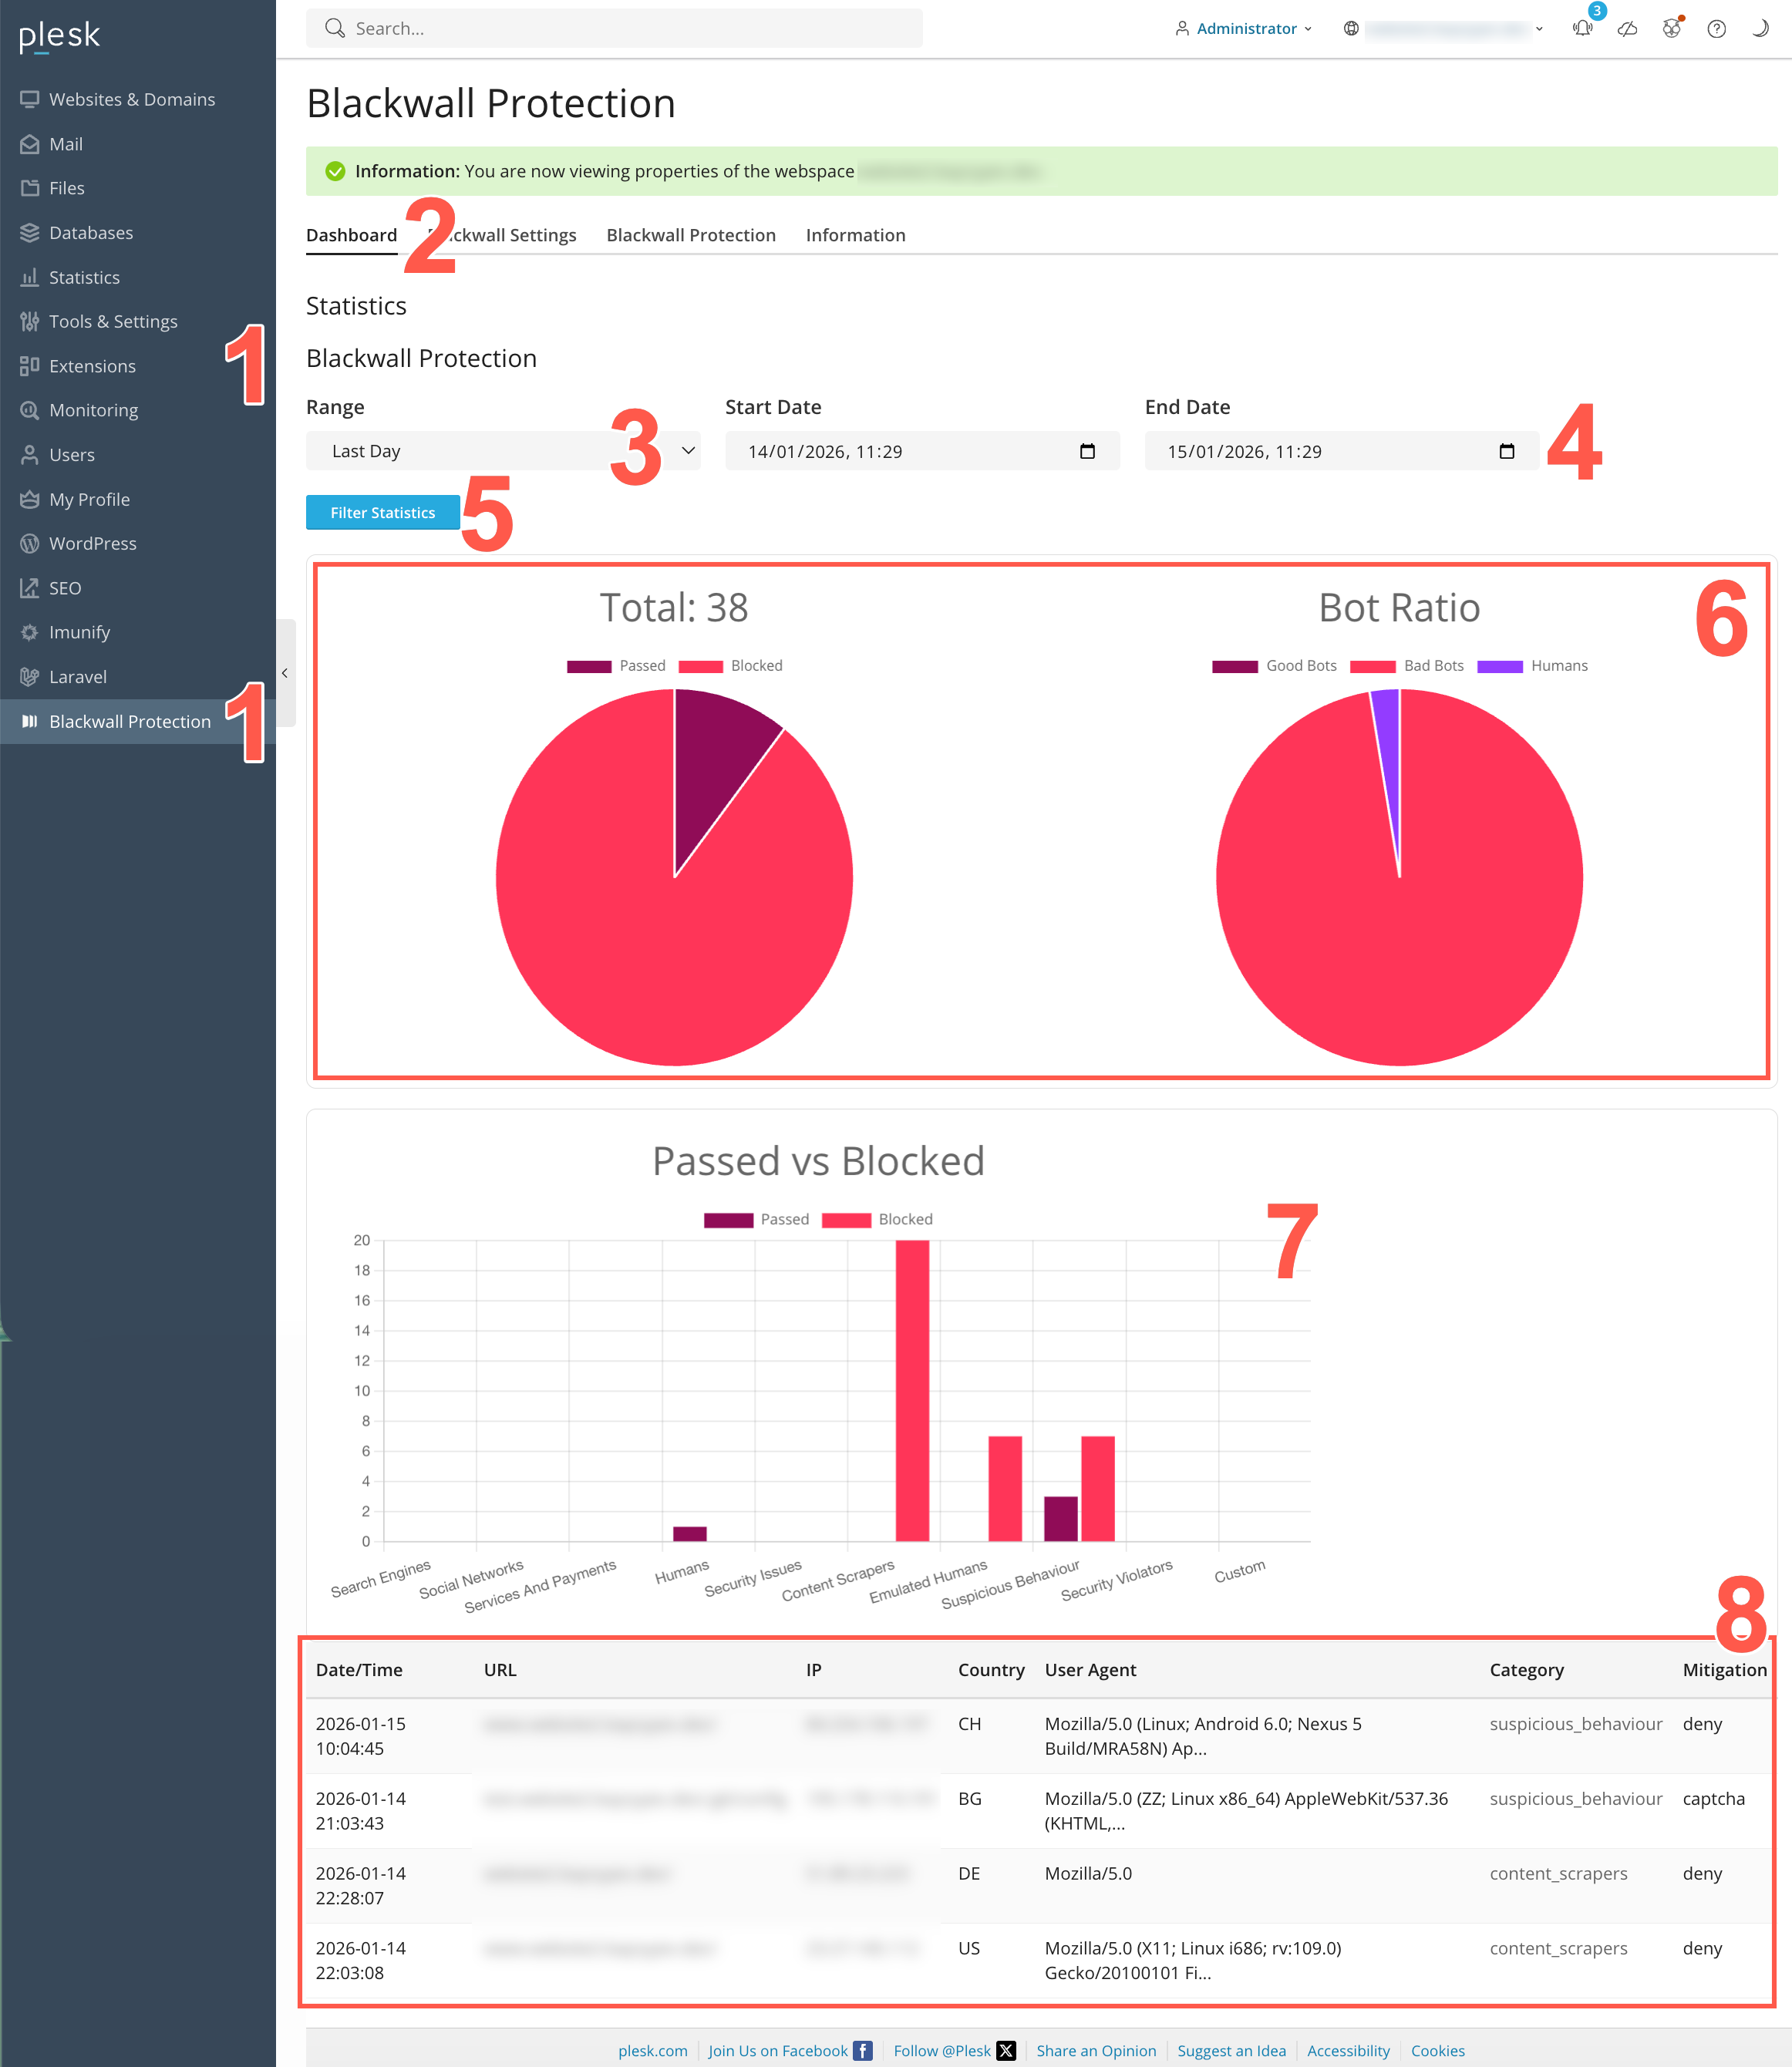
- When the Blackwall extension page displays, select the Dashboard tab.
- In the Range dropdown, you can select a pre-defined time period using the date selector. Choose from Last Hour, Last Day, Last Week, or Last Month.
- Alternatively, in the previous step choose Bespoke. Then in the Start Date and End Date fields, define a custom time period using the date selectors.
- Click Filter Statistics to filter all statistics. All widgets on the page instantly refresh to show data filtered for the time period selected.
- Use the widgets displayed at the top of the page to keep up to date with your basic security metrics. The first pie chart in this widget includes the number of bots processed, along with the proportion of this number passed or blocked by Blackwall checks. The second pie chart in the widget provides a proportional breakdown between good bots, bad bots, and humans.
- Use the Bot Classification widget displayed centrally on the page to visualise bot activity against each classification. This widget uses a bar chart to show the number of requests categorized for easch classification. Each category bar is divided into Passed and Blocked portions, indicating whether the bot traffic was allowed or mitigated. This visualization helps analyse which bot types are most active and how mitigation is being applied across different categories.
- Use the Bot Classification widget displayed at the bottom of the page to view bot interceptions (both good and bad) in chronolgical order.
Using the Blackwall Extension - Domain Owners
After enabling protection, you can use the plugin in the same way as users of the main Blackwall platform. All data is automatically synchronized with your Blackwall account. Apart from the appearance of the plugin's user interface, the functionality is largely identical to your Blackwall account.
- Log into your Plesk account.
- From the left sidebar, select Websites & Domains.
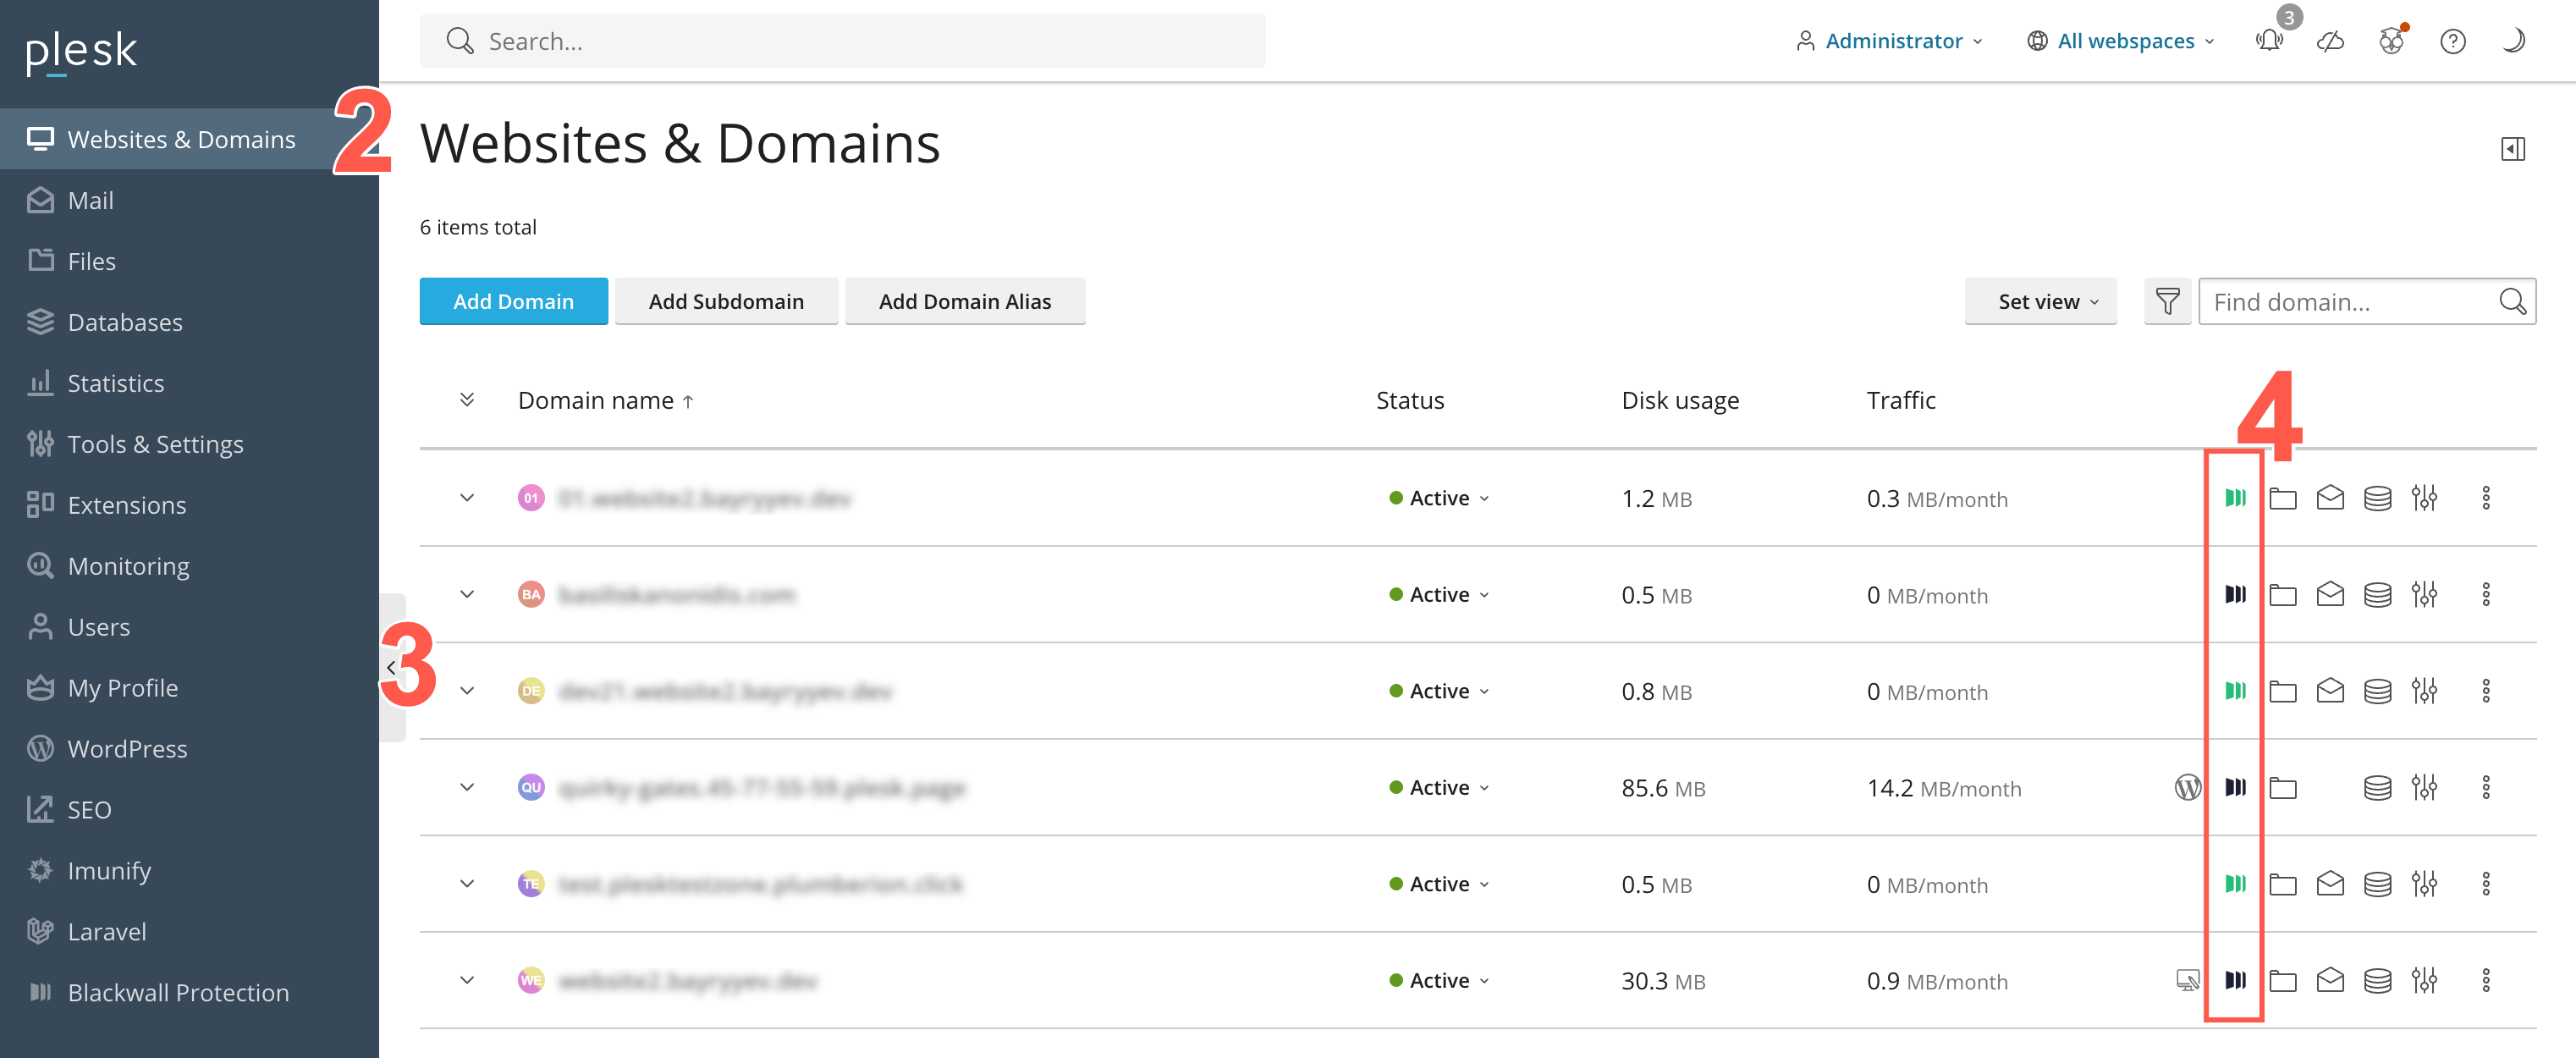
- Scroll the list of domains displayed until you find the one that you are looking for. Alternatively, use the Find domain search field at the top right of the page.
- Click the Blackwall icon that corresponds with your desired domain listing. The icon button color indicates the current status of each domain, as follows:
 The domain isn’t set up in Blackwall (or the GK API can’t be reached). If you click the button in this state, it opens the plugin Settings page.
 The domain is set up in Blackwall and fully protected. If you click the button in this state, it opens the plugin Statistics page.
 The domain is set up in Blackwall, but protection is turned off (monitoring only). If you click the button in this state, it opens the plugin Statistics page.
-
When the Blackwall Protection page displays for your selected domain, the Statistics tab is displayed by default. Click on any of the tabs available:
- Gatekeeper
- Monitoring & Analytics
- Performance
- Security
Gatekeeper
The Gatekeeper page provides settings to activate or adjust performance, caching, and security options, helping you to enhance website protection and improve user experience. To access and use the Settings tab:
- Repeat steps 1-4 from the above section Using the Blackwall Extension - Domain owners/admins.
- Click the Gatekeeper tab.
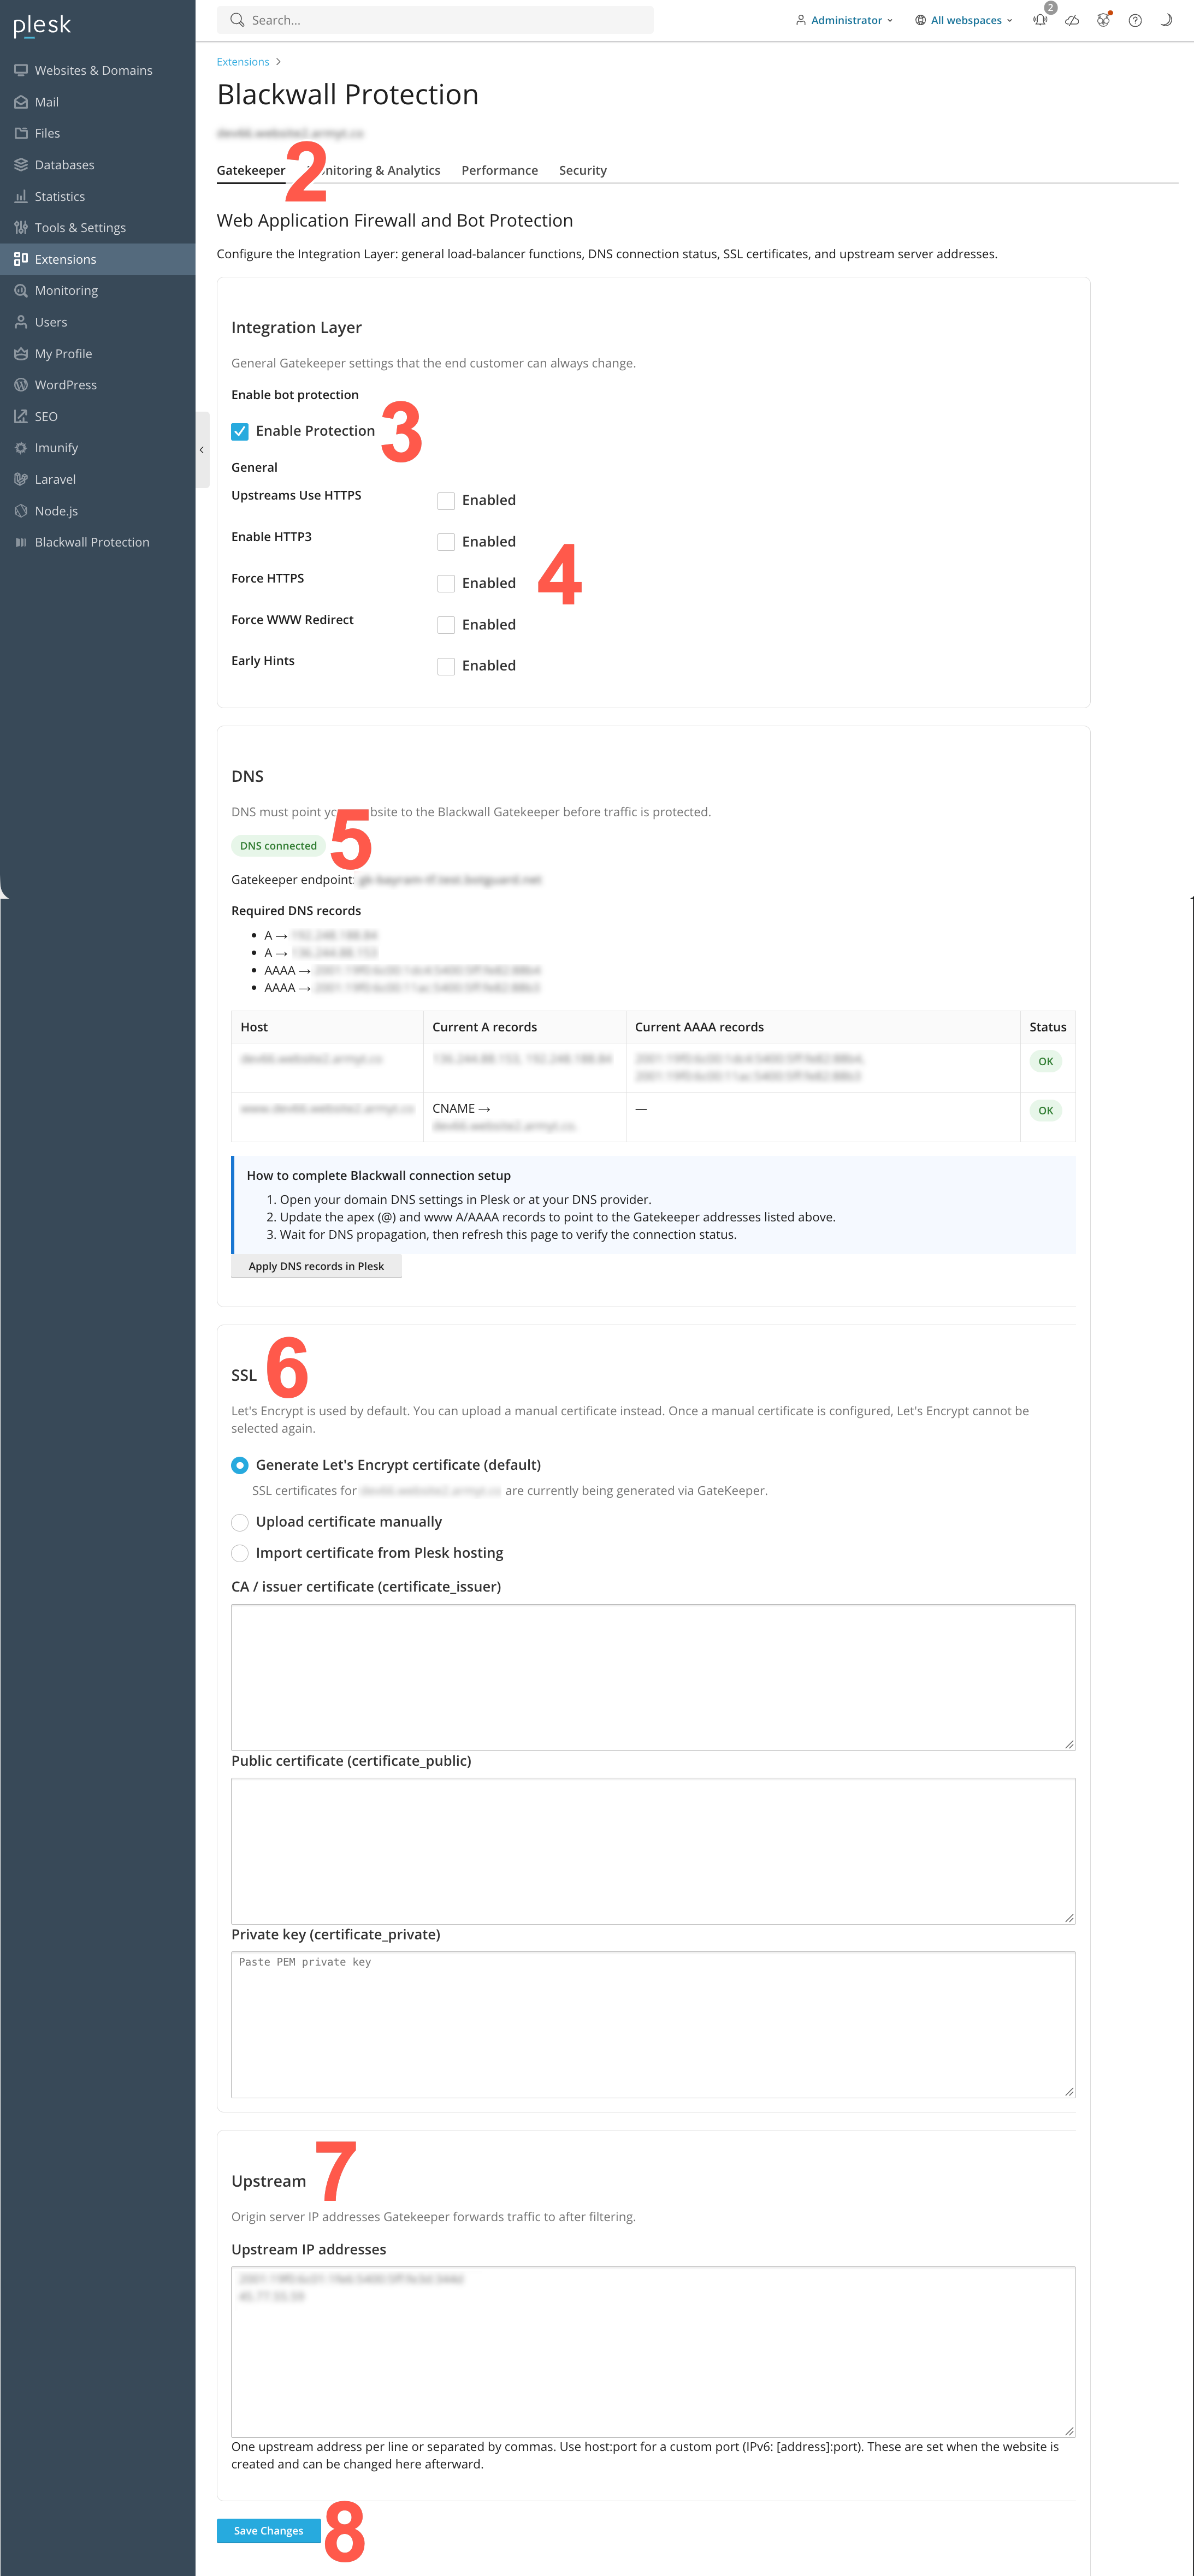
- Optionally, place a check in the Enable the protection checkbox to to enable/disable Blackwall protection for your selected website or domain. Alternatively, remove the check to disable it.
-
In the Website Settings panel, select the checkboxes for the default website settings that you want to include in your new product.
- Upstreams Use HTTPS - Check this checkbox if your origin(s) serve content over an HTTPS (port 443). When selected, GateKeeper will connect securely to the upstream rather than using HTTP. If left unchecked, GateKeeper will use HTTP (port 80) by default to fetch content from the origin.
- Enable HTTP/3 - GateKeeper speaks HTTP/3 (QUIC/UDP) to compatible clients, improving performance on modern browsers and mobile devices. Leave unchecked if you need to disable HTTP/3 for compatibility or DDoS concerns.
-
Force HTTPS - Enable to automatically redirect all incoming HTTP (port 80) requests to HTTPS (port 443). When enabled, GateKeeper also adds security headers and rewrites
http://references in response bodies tohttps://. The recommended long-term solution is to configure the application to generate HTTPS URLs directly.Disable response-body rewriting while retaining Force HTTPS
If you need to keep HTTP-to-HTTPS redirection enabled but prevent GateKeeper from rewriting
http://URLs in response bodies:-
Back up the domain configuration:
-
Find each occurrence of:
-
For each occurrence found, comment it out:
-
Do not modify:
Leave Force HTTPS enabled.
-
Reload the NGINX configuration or restart the service.
Warning
HTTP URLs generated by the application may cause mixed-content warnings if they are used to load browser resources.
Updating the application to generate HTTPS URLs directly is the recommended long-term solution.
-
-
Force WWW Redirect - Select one of these radio buttons to control how requests to any listed subdomains redirect back to the canonical hostname.
- Early Hints - Allows GateKeeper to send HTTP 103 “Early Hints” responses during the initial TLS handshake, so that browsers can start preloading resources (e.g., CSS/JS) before the final HTML is delivered. This improves load times, leading to a faster browsing experience.
-
The DNS section displays the domain's current DNS configuration and connection status, helping you verify that website traffic is routed through Blackwall GateKeeper. The section provides the following information:
- DNS connection status, which indicates whether the domain's DNS records are correctly configured to route traffic through GateKeeper. A green DNS connected status indicates a successful connection.
- Gatekeeper endpoint, which displays the GateKeeper endpoint associated with the protected domain.
- Required DNS records listing the IPv4 (A) and IPv6 (AAAA) addresses that the domain must use to route traffic through GateKeeper.
- Current DNS records, which displays the domain's existing DNS configuration, including its A, AAAA, or CNAME records, and indicates whether each host is correctly configured.
If the status indicates that DNS is not connected, follow these steps:
- Review the required DNS records and compare them with the domain's current DNS configuration.
- To update the records, use one of the following methods. Either click Apply DNS records in Plesk to apply the required DNS configuration through Plesk, or update the relevant DNS records manually in Plesk, or through your external DNS provider.
- Allow time for the DNS changes to propagate, then refresh the page to verify the connection status.
-
In the SSL section, configure the SSL/TLS certificate that GateKeeper uses to serve your protected domain over HTTPS.
- Choose one of the following radio button options:
- Use Generate Let’s Encrypt certificate (recommended) to automatically request and renew an SSL/TLS certificate for your domain through GateKeeper. If you select this option, no certificate details need to be entered manually. Continue to step 12.
- Use Upload certificate manually if you already have a signed certificate and private key (for example, from a third-party CA or a wildcard certificate that you purchased), select this option to upload your files. If you choose this file, you must upload necessary files in the next two steps.
- Use Import certificate from Plesk hosting to import an existing SSL/TLS certificate and its private key from your Plesk hosting environment into GateKeeper, without having to upload the files manually.
- If you selected Upload certificate manually in step a., now in the CA/ issuer certificate field, enter or paste the intermediate CA certificate or certificate chain supplied by your certificate provider, in PEM format. Include the -----BEGIN CERTIFICATE----- and -----END CERTIFICATE----- lines. If no additional issuer certificate is required, leave this field blank.
- If you selected Upload certificate manually in step a., enter or paste your domain's SSL/TLS certificate in PEM format in the Public certificate field, including the -----BEGIN CERTIFICATE----- and -----END CERTIFICATE----- lines.
-
If you selected Upload certificate manually in step a. enter or paste the private key associated with the public certificate into the Private key field, in PEM format. Ensure that the private key matches the public certificate provided above.
Note
Confirm that the certificate, issuer certificate, and private key are correct. The SSL configuration will not work if the private key does not match the public certificate, or if the certificate chain is incomplete.
- Choose one of the following radio button options:
-
In the Upstream IP addresses field, review or update the IP addresses of the origin servers to which GateKeeper forwards traffic after filtering. Enter one IP address per line or separate multiple addresses with commas. To specify a custom port, append a colon and the port number (for example, 1.2.3.4:8080 for IPv4 or [2001:c0c0:d1d:babe:dead::1]:8080 for IPv6). These addresses are configured when the website is created but can be updated here.
- Click Save Changes.
Monitoring & Analytics
Statistics
In the context of the Blackwall platform, Statistics are metrics relating to actions, activities, or occurrences that the platform tracks and analyzes to determine whether traffic is generated by a human or a bot. These metrics provide a visual insight into overall performance relating to your selected website asset. In the Plesk extension, to access and configure Statistics for a selected website asset, perform the following tasks:
- Repeat steps 1-4 from the above section Using the Blackwall Extension - Domain Owners/Admins.
- Click the Monitoring & Analytics tab.
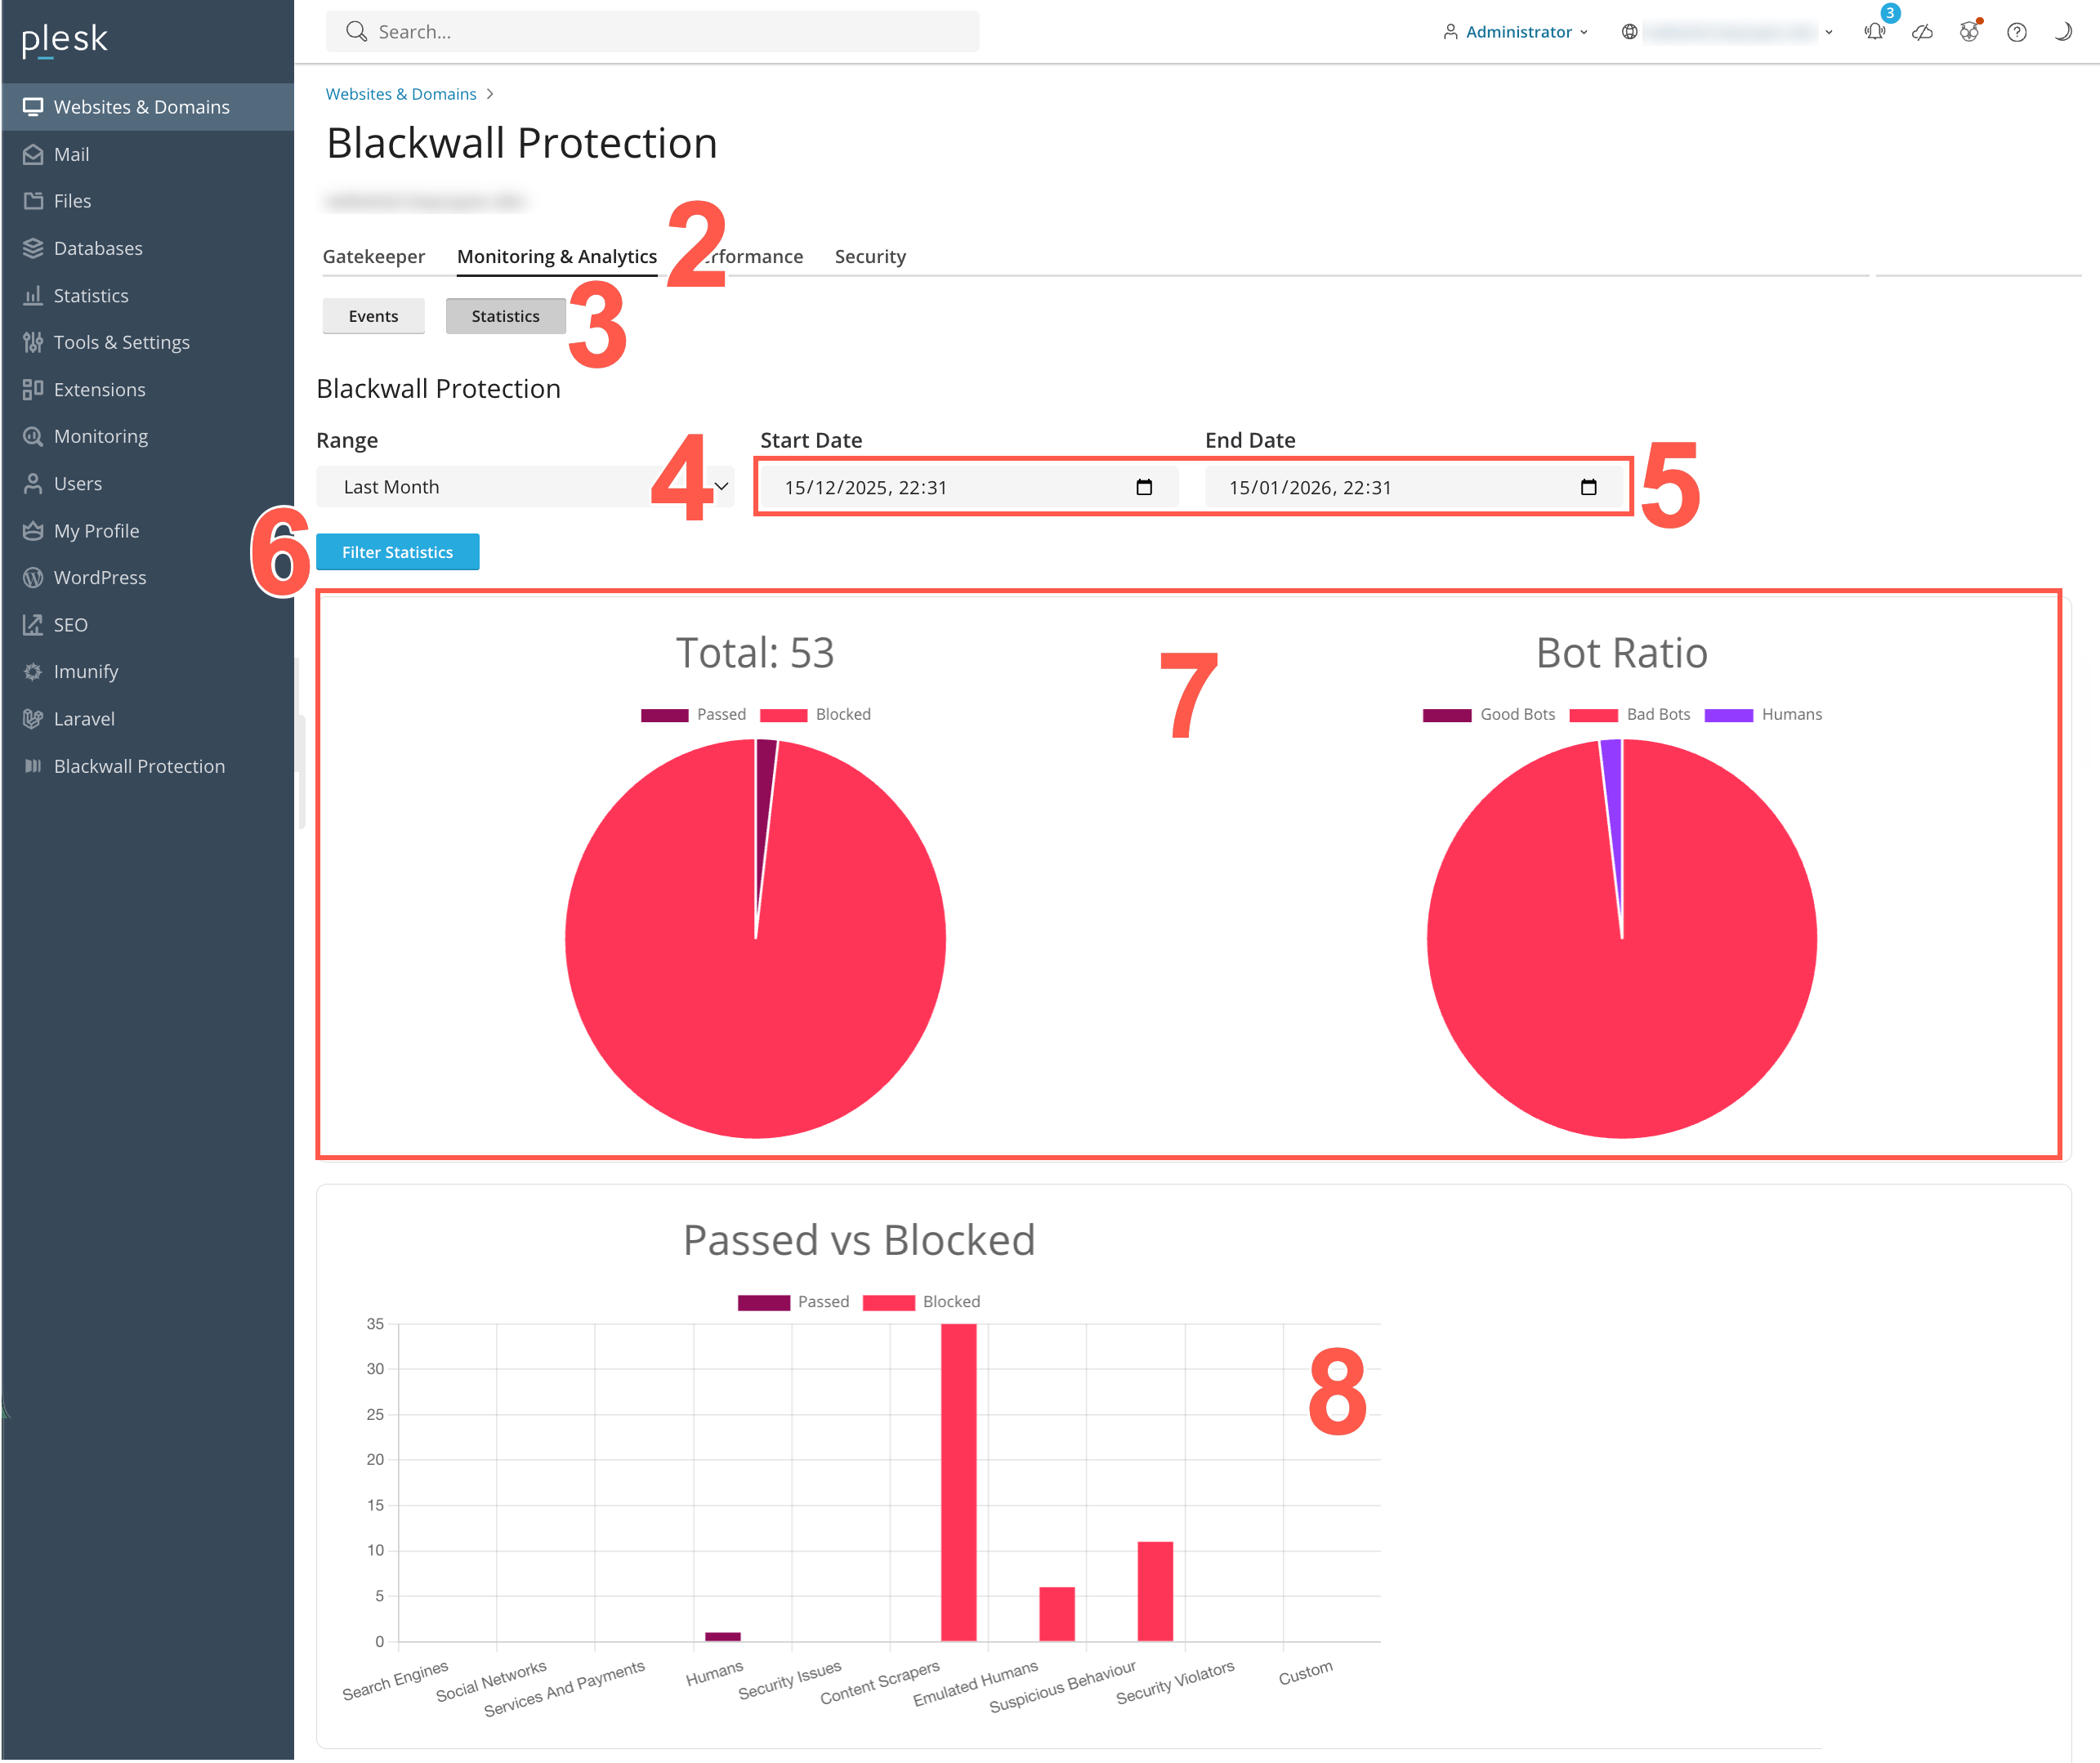
- In the displayed sub-tabs, click Statistics.
- In the Range dropdown field, you can select a pre-defined time period using the date selector. Choose from Last Hour, Last Day, Last Week, or Last Month.
- Alternatively, in the previous step choose Bespoke. Then in the Start Date and End Date fields, define a custom time period using the date selectors.
- Click Filter Statistics to filter all statistics. All widgets on the page instantly refresh to show data filtered for the time period selected.
- Use the widget displayed at the top of the page to keep up to date with your basic security metrics. This widget includes the number of bots processed, along with the proportion of this number that were passed or blocked by Blackwall checks.
- Use the Bot Classification widget displayed centrally on the page to visualise bot activity against each classification. This widget uses a bar chart to show the number of requests categorized for easch classification. Each category bar is divided into Passed and Blocked portions, indicating whether the bot traffic was allowed or mitigated. This visualization helps analyse which bot types are most active and how mitigation is being applied across different categories.
Events
In the context of the Blackwall platform, events are the actions, activities, or occurrences that the platform tracks and analyzes to determine whether traffic is generated by a human or a bot. Events are fundamental to Blackwall's detection capabilities, as they provide the raw data needed to make critical decisions about suspicious or malicious behavior. To access and view the Events tab for all your listed assets, perform the following tasks:
- Repeat steps 1-4 from the above section Using the Blackwall Extension - Domain owners/admins.
- Click the Monitoring & Analytics tab.
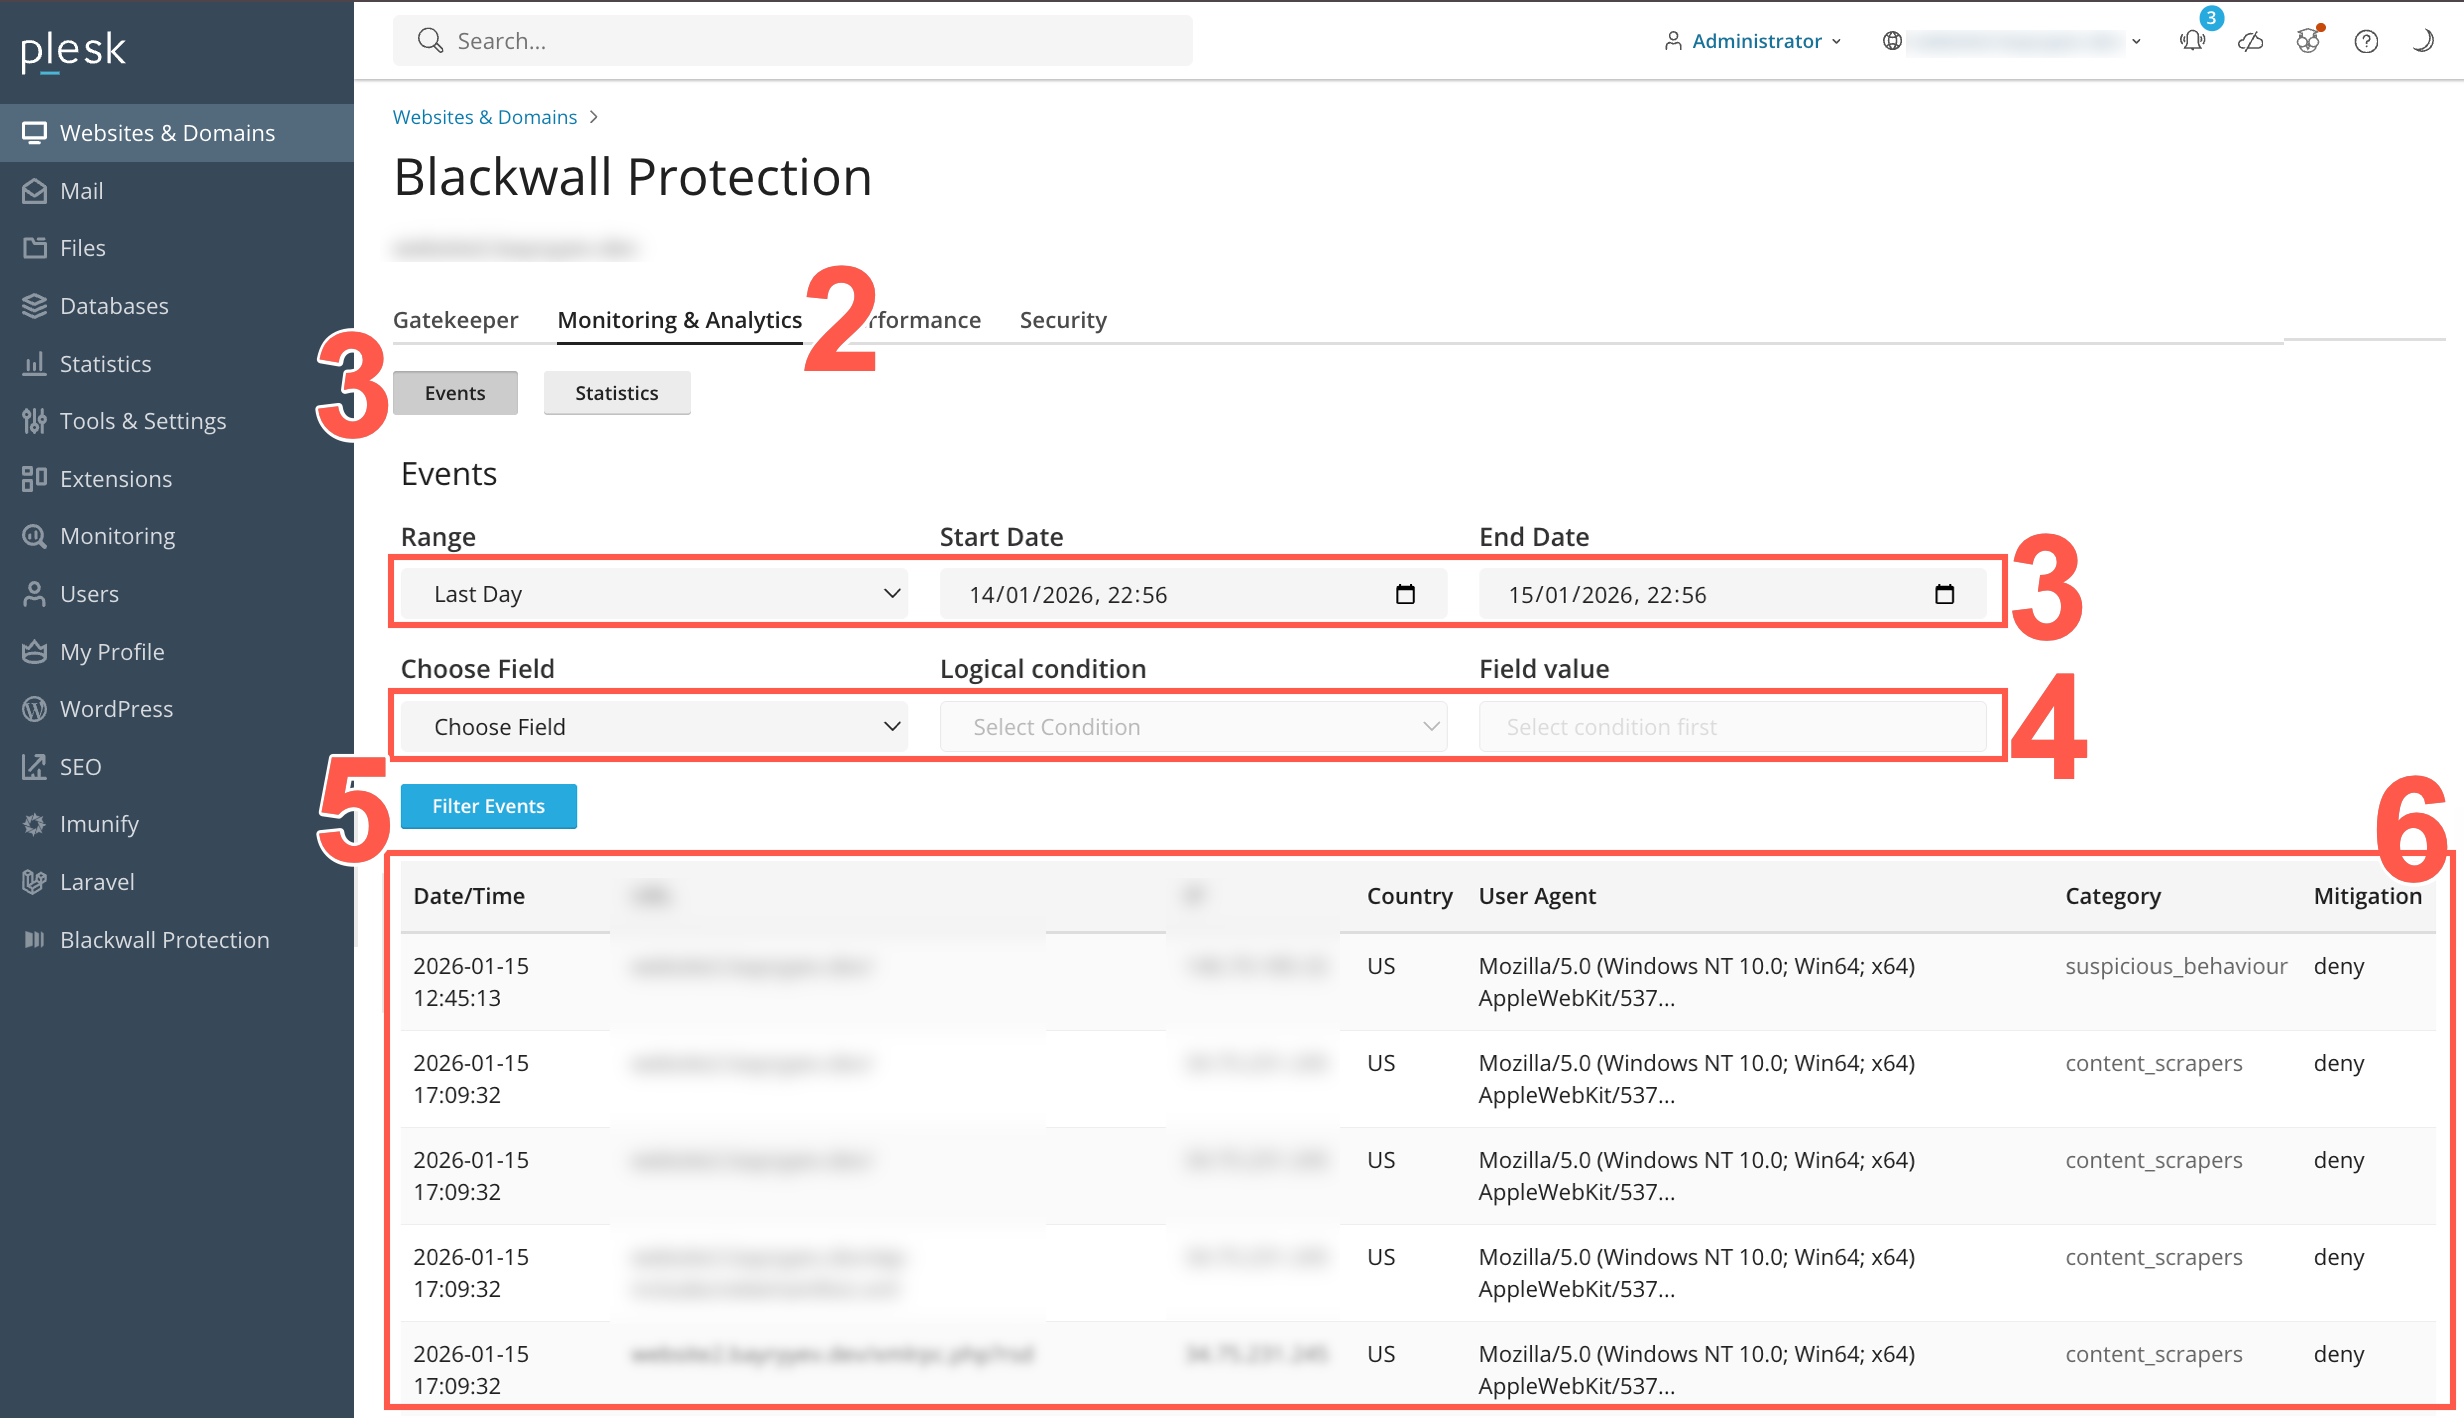
- In the displayed sub-tabs, click Events.
- Optionally, define a time period.
- In the Range dropdown field, you can select a pre-defined time period using the date selector. Choose from Last Hour, Last Day, Last Week, or Last Month.
- Alternatively, in the Range dropdown field, choose Bespoke. Then in the Start Date and End Date fields, define a custom time period using the date selectors.
- Optionally, populate the conditional filter fields to filter events according to defined logic.
- In the Choose Field dropdown, select a data attribute to filter on.
- In the Logical Condition field, select from the following operators: equals, not equals, contains, not contains, any of, or matches regex.
- In the Field Value field (which can be a text field or dropdown field depending on the Logical Condition selected in the previous step) select or input the value to use with your selected logical filter.
- Click Filter Statistics to filter all statistics. All widgets on the page instantly refresh to show data filtered for the configured filters.
- Review the events listed in the resulting table. The table displays various attributes associated with each event, including Date/Time stamp for an event, the URL and IP address associated with the event, the Country of origin for the event, the User Agent string sent by the web browser responsible, the Category of bot, and finally the Mitigation adopted (if any).
Performance
The Performance tab lets you manage the caching features available for your website, based on the components assigned by your hosting provider. You can enable or disable caching for static files and dynamic pages to improve website performance and reduce the load on your origin server. To configure these settings:
- Repeat steps 1-4 from the above section Using the Blackwall Extension - Domain owners/admins.
- Click the Performance tab.
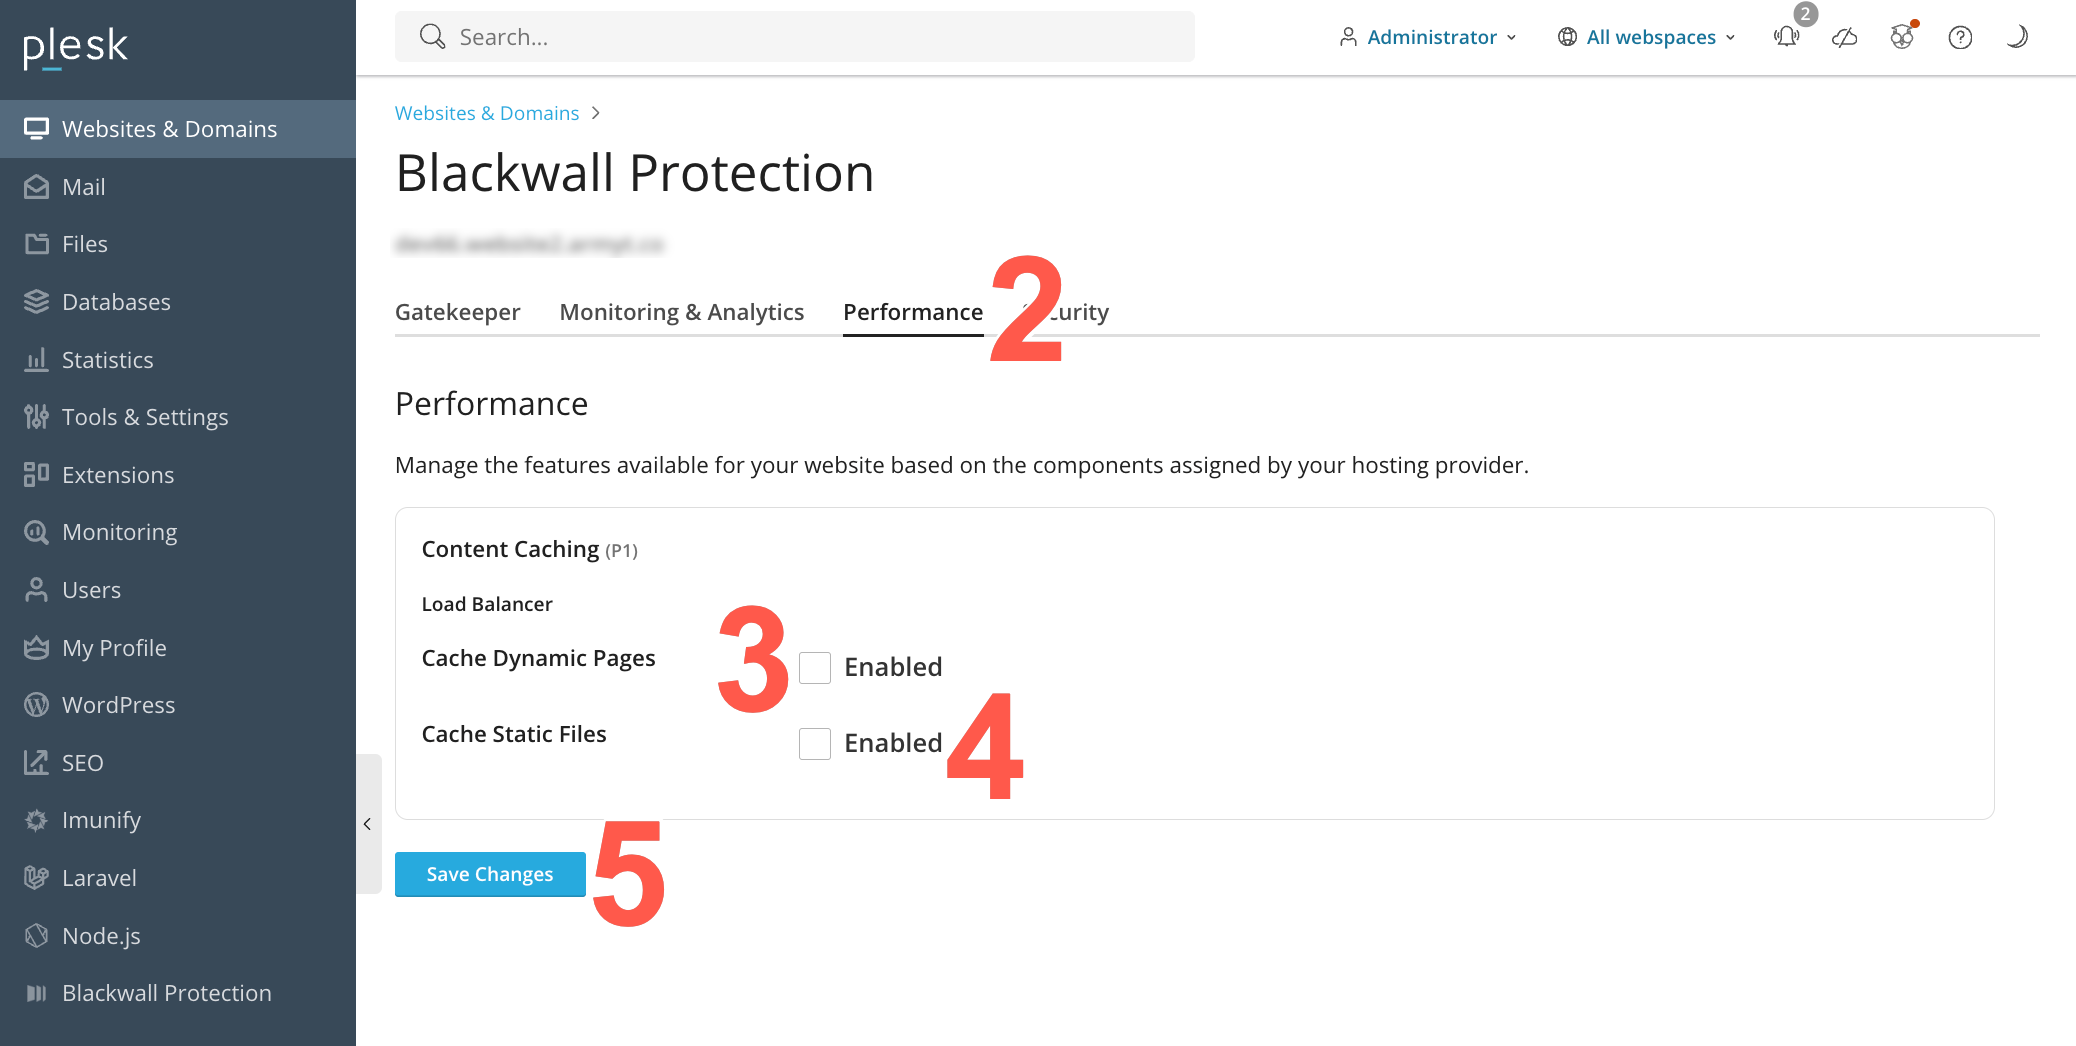
- Optionally, place a check in the Enable static resources caching checkbox, if you want to activate this funtcionality. If checked, GateKeeper caches images, CSS, JavaScript, and other static files locally on the edge. This speeds up asset delivery and reduces load on your origin server.
- Optionally, place a check in the Enable dynamic resources caching checkbox, if you want to activate this funtcionality. If checked, GateKeeper also caches HTML pages and other 'dynamic' content for a configurable short period. Use with caution: caching dynamic content may cause delays in showing newly published data (e.g., blog posts, user-specific pages).
- Click Save Changes.
Security
Security
The Security tab enables you to control how different categories of traffic are treated. It allows you to grant, deny, or challenge access for groups such as search engines, social networks, cloud services, humans, and malicious automation. It also enables platform-specific exclusions, where preset rules can help to reduce false positives by automatically adapting bot-protection behaviour for common CMS and web application frameworks.To access and use the Security tab:
- Repeat steps 1-4 from the above section Using the Blackwall Extension - Domain owners/admins.
- Click the Security tab.
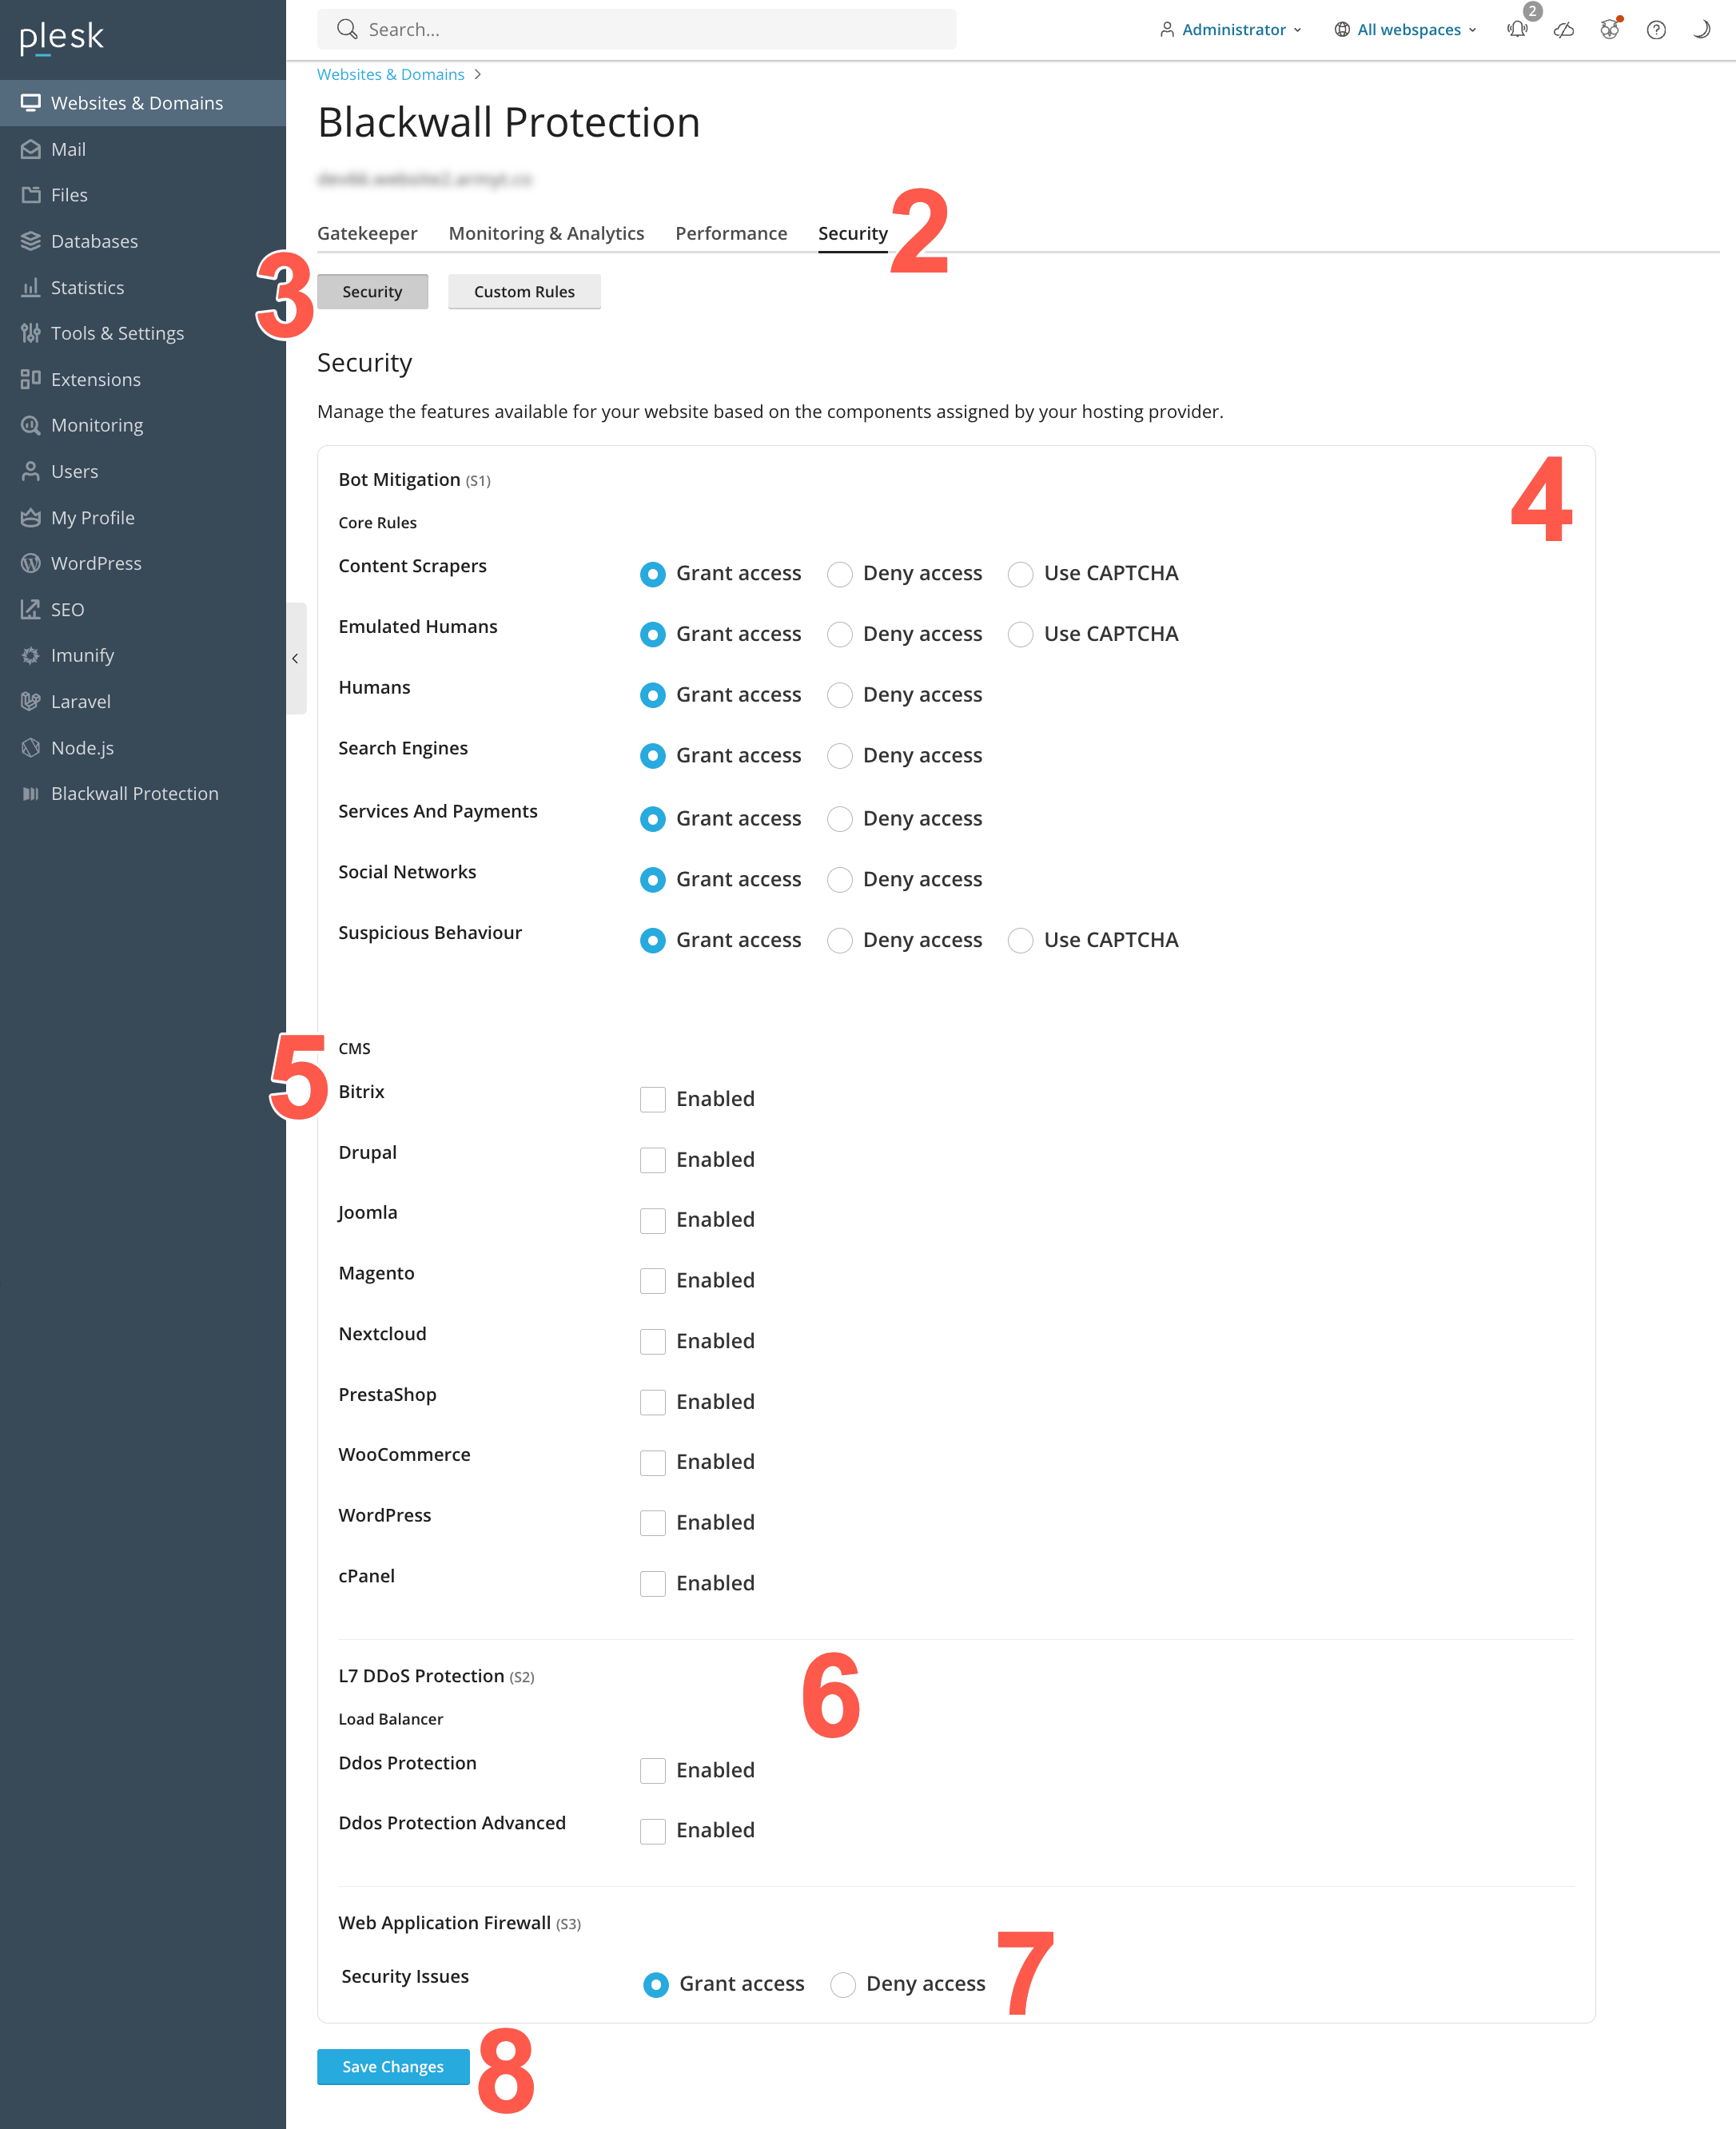
- In the displayed sub-tabs, click Security.
-
From the eight core rules displayed in the Bot Mitigation (S1) section, locate the rule that you wish to modify. For the rule that you choose to modify, select a checkbox that corresponds to your desired behaviour. The available checkboxes are:
- Grant access
- Deny access
- Use CAPTCHA (only available on some rules)
Description of Blackwall core rules
We recommend that you grant access to the first four:
-
Search Engines - Search engine crawlers such as Google, Bing, Yahoo, and other indexing services that scan websites to discover and rank content in search results. These bots are generally considered trusted traffic and are important for SEO visibility, search discoverability, and content indexing. Administrators can choose to allow or deny access depending on business or security requirements.
-
Social Networks - Bots and crawlers operated by social media platforms such as Facebook, X (Twitter), LinkedIn, and others. These services typically access websites to generate link previews, retrieve metadata, or analyse shared content. Allowing these visitors helps ensure correct rendering of shared links and social media integrations.
-
Services and Payments - Automated traffic originating from recognised cloud-based services, infrastructure providers, or monitoring platforms. This category may include uptime monitoring tools, performance scanners, analytics platforms, and other legitimate cloud-hosted services. Depending on your environment, these services may be required for monitoring, integrations, or operational visibility.
-
Humans - Typical human visitors accessing the website through desktop browsers, mobile devices, or office networks. This category represents normal end-user traffic and is generally expected to have unrestricted access to website resources. Additional protections, such as content encryption, can be applied to secure content delivery and reduce automated analysis of sensitive page content.
We recommend that you deny access to the last four:
-
Security Issues - Visitors identified as potentially malicious or associated with abusive, hostile, or suspicious activity. This may include hackers, vulnerability scanners, exploit frameworks, credential-stuffing tools, or automated systems attempting to probe or attack the website. Blocking these visitors helps reduce security risks, prevent reconnaissance activity, and protect application resources from abuse.
-
Content Scrapers - Automation tools designed to collect, copy, analyse, or archive website content at scale. These visitors are commonly associated with data scraping, competitive intelligence gathering, AI dataset collection, or automated content harvesting. Depending on business requirements, administrators may choose to block these visitors, challenge them with CAPTCHA, or apply content encryption to help protect sensitive or proprietary content.
-
Emulated Humans - Advanced automation frameworks and next-generation bots that attempt to mimic legitimate browser behaviour in order to bypass traditional bot detection mechanisms. These visitors may simulate mouse movement, browser execution, session handling, or other human-like interactions. Because these bots are often associated with credential abuse, scraping, or automated attacks, they typically require stricter mitigation measures such as CAPTCHA enforcement, encryption, or access denial.
-
Suspicious Behaviour - Visitors exhibiting unusual, abnormal, or potentially abusive behaviour patterns detected by Blackwall’s analysis engine. This category may include excessive request rates, behavioural anomalies, suspicious navigation patterns, or activity commonly associated with automated abuse or account compromise attempts. Administrators can apply additional protections such as CAPTCHA challenges, encryption, or outright blocking to reduce the risk posed by suspicious traffic.
Default Core Rule settings
Blackwall's Core Rule settings in Plesk are initially all set to Grant access to allow all traffic by default. Make sure to change these rules to best suit your needs.
-
From the ten rulesets displayed, locate the ruleset that you wish to modify. Then place a check in the corresponding checkbox to enable the ruleset, or remove the check from the checkbox to disable it.
- In the L7 DDoS Protection (S2) section, place a check in the checkbox that corresponds with one or both DDoS options:
- Mitigate DDoS attacks - Limits the number of simultaneous connections and the rate of requests from a single IP to help prevent volumetric or application-layer DDoS floods. Requires bot protection enabled first.
- Advanced DDoS protection - If enabled (and if bot protection is already on), GateKeeper will block attacking IPs at the firewall level for the entire cluster—returning a TCP RST or UDP rejection instead of serving HTTP 403 pages. Use this only if your site has experienced large-scale DDoS events.
- In the Web Application Firewall (S3) section, you can choose to Enable bot protection. When checked, GateKeeper’s Web Application Firewall (WAF) and Bot Management services inspect incoming requests to block known malicious bots, scrapers, and automated attacks.
- Click Save Changes.
Custom Rules
Custom Rules are different to Blackwall's Core Rules. Whilst our default Core Rules greatly decrease bot traffic for your website(s), some visitor behavior might still present a cause for concern. This is where our Custom Rules engine can help you to eliminate those visitors from accessing your website. The Custom Rules engine may be used for bespoke purposes, but the main two purposes are:
- Whitelisting (unblocking) of currently blocked services and clients.
- Blocking of services and clients that currently have access to your site.
To access and configure the Custom Rules tab:
- Repeat steps 1-4 from the above section Using the Blackwall Extension - Domain owners/admins.
-
Click the Security tab.
-
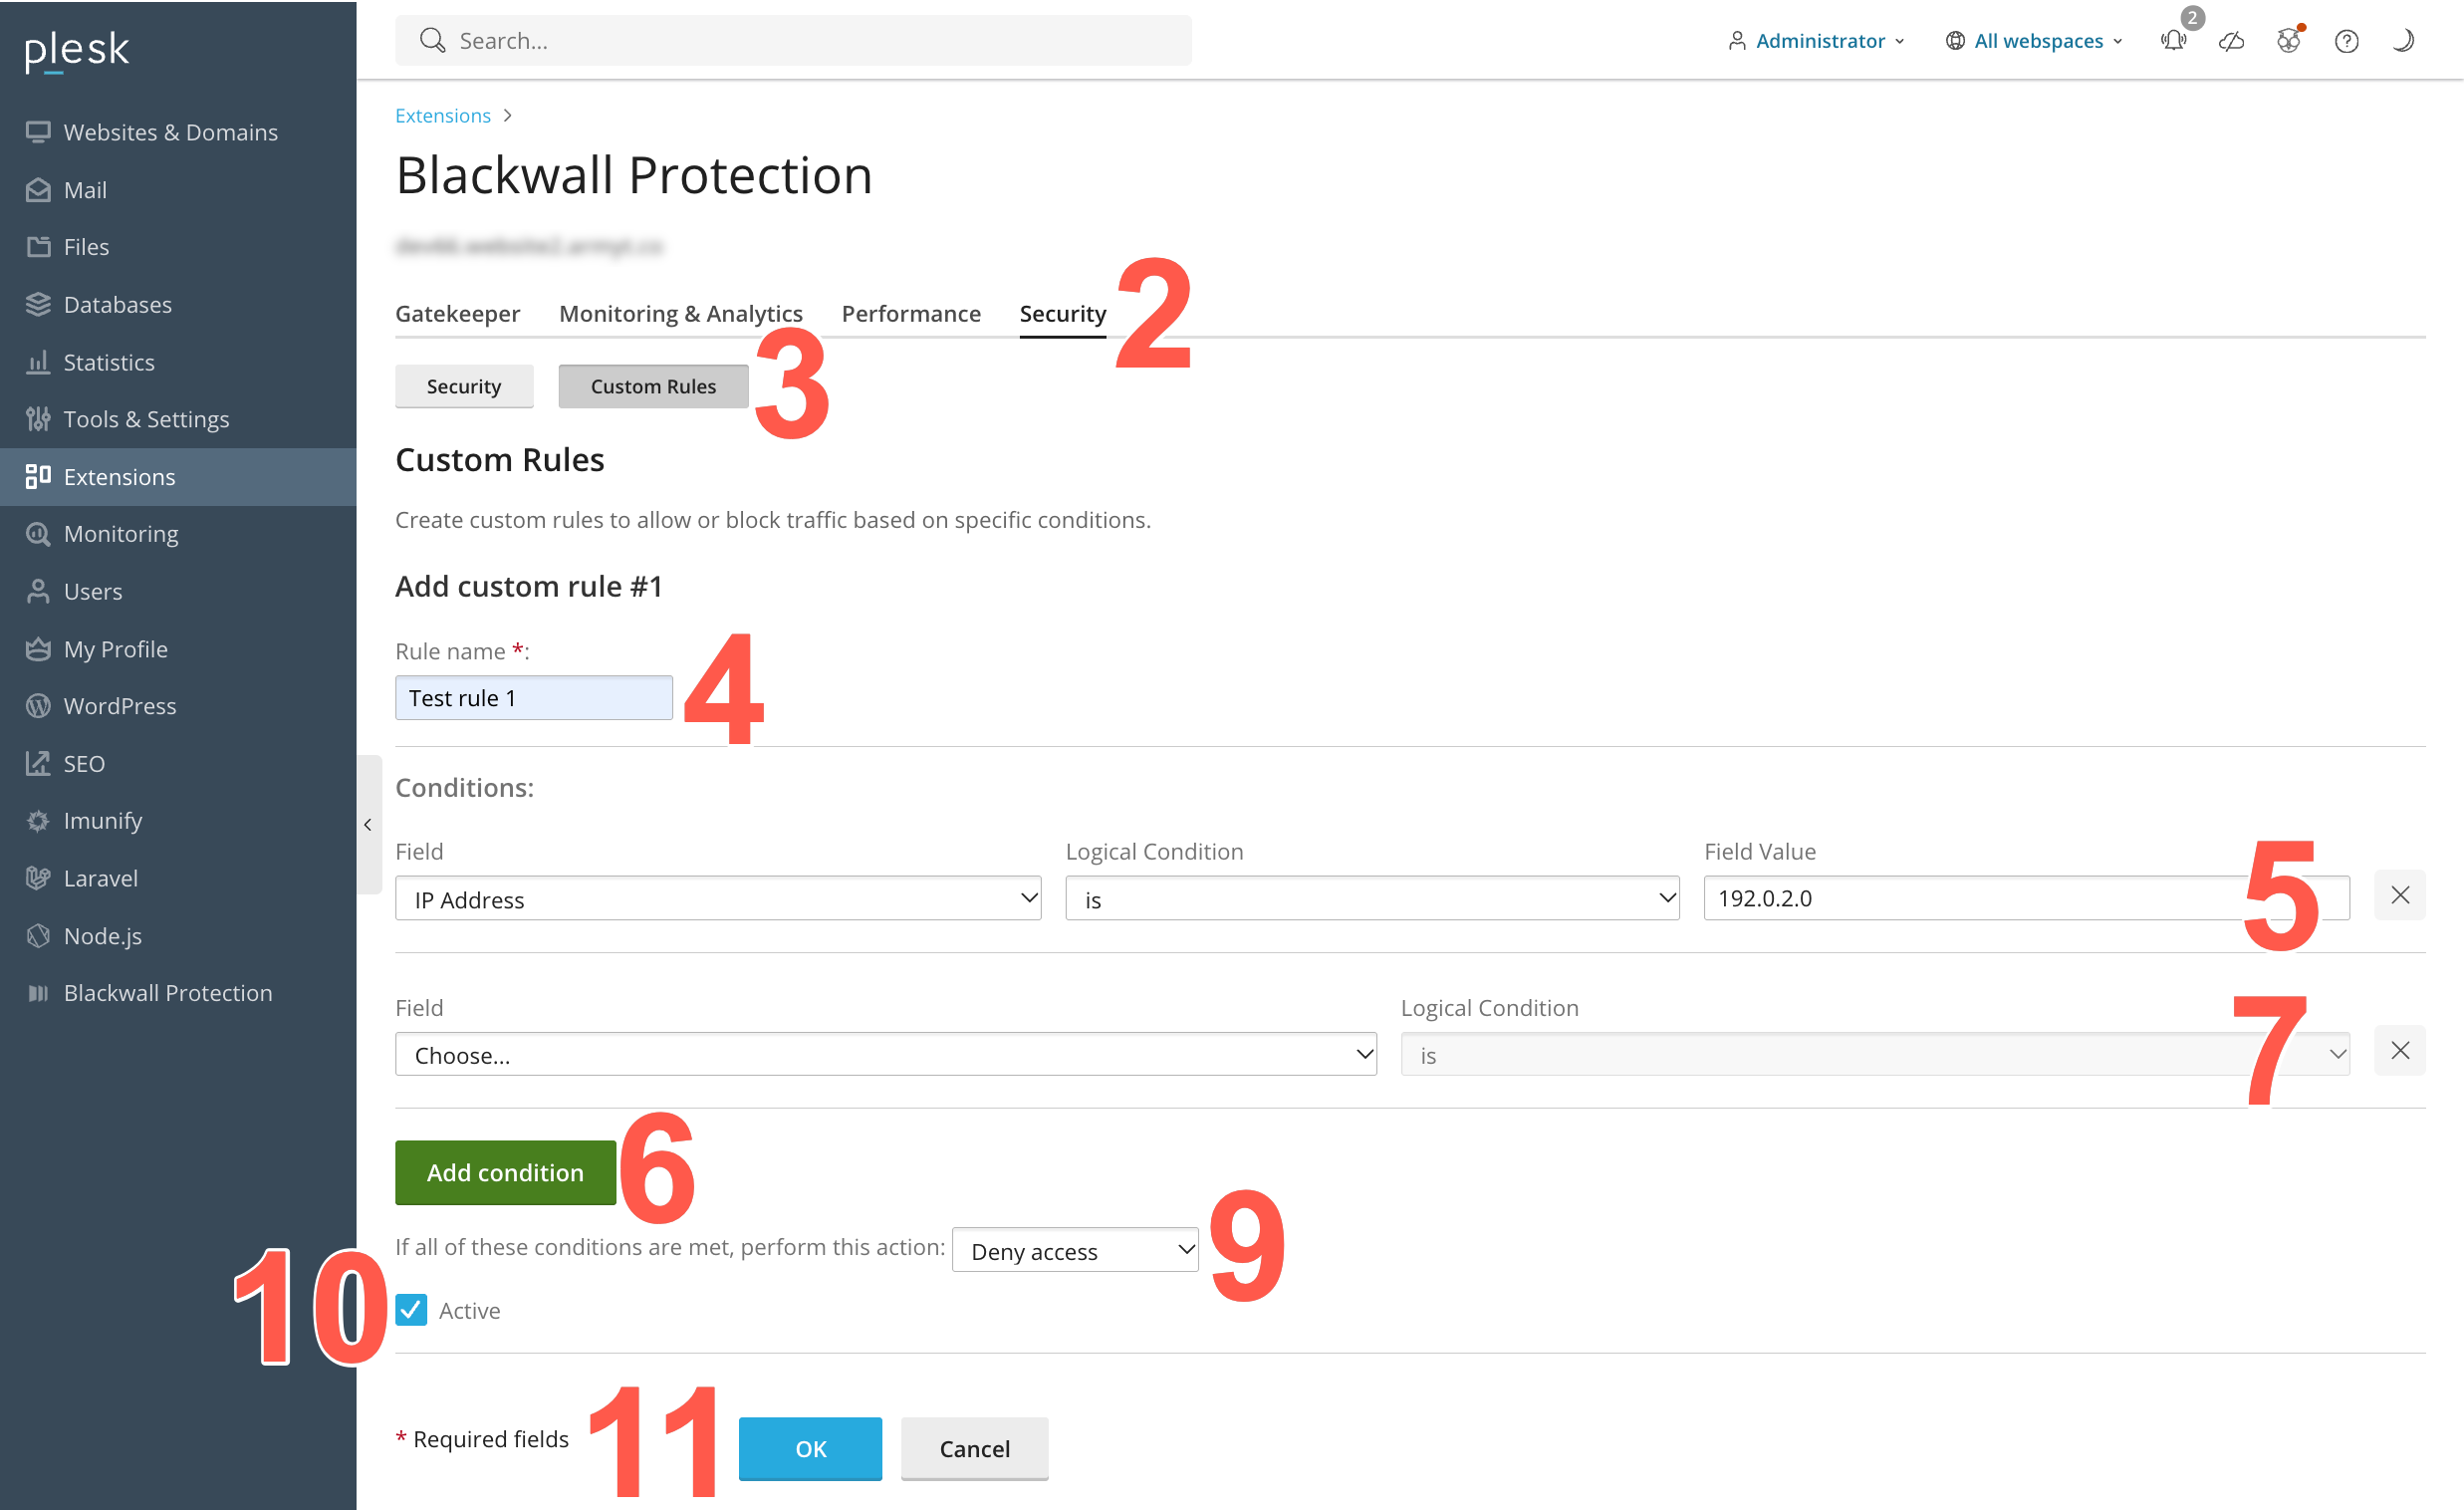
In the displayed sub-tabs, click Custom Rules.
- In the Add custom rule #1 section, name your rule, by typing a unique name into the Rule name field.
- Set the trigger Conditions for your rule:
- In the Field dropdown menu, select from the listed criteria.
Click to review the criteria options
- Autonomous System Number - type the AS number using numbers only, but do not include a prefix with AS/ASN abbreviations.
- User-Agent - the corresponding HTTP header, which is sent by any software that makes a request to your server. You could use this condition to block/allow requests from various browsers, like Google Chrome, Mozilla Firefox (or their mobile versions), CLI tools like wget or curl, programming languages libraries, like Urllib or requests in Python, Go Http Client, libwww-perl, etc. You can also try exploring the world of various User-Agents to get more examples via special databases. We recommend checking out whatismybrowser.com or useragentstring.com.
- Country Code - used to restrict access based on visitor geography.
- IP Address - our advice is to whitelist administrator/developer/QA IP addresses (IPv4 or IPv6 - Blackwall supports both). These people often use custom software and send unusual requests to the site, which might be blocked otherwise. Please be sure to whitelist your site’s uptime monitor IP address. This condition supports CIDR notation to list IP subnets, like 123.123.123.123/24. You can also easily list different subnets in a single rule using the ‘Is any of’ match type (separating each subnet with a comma followed by a space, for example: first, second, third, ).
- Referrer URL - a browser sends the location of where a link to your site was clicked in a special "Referer HTTP Header. One common Custom Rule, which might be useful for you, is to block visitors with an empty ‘Referer’ header. When the ‘Referer’ header is empty, it means that the client made a direct request to the site, and didn’t follow any link or perform any search request prior to the visit. Most of the time it’s fine, because it means the user typed your site address from memory, but sometimes it’s an indicator of bot traffic.
- Internet Service Provider - firstly, type the ISP name and secondly, type the AS number using numbers only. Do not include a prefix with AS/ASN abbreviations.
- HTTP Header - condition does the same as the two headers above, but you could use any HTTP header here, even non-standard ones.
- URI Path - this condition allows you to grant or deny requests that were sent to certain URLs on your site. You should omit the scheme and domain name to use it. For example, a bot is sending requests to URL
https://www.example.net/some/path/resource.html, in which case you would use/some/path/resource.htmlfor the rule. Commonly used with the Match to expression match type to cover multiple files and directories via Regular Expressions. - Domain - our service automatically protects the subdomains for your main domain name. But sometimes you might need to apply a Custom Rule to some specific subdomains, this is where you should use this condition.
- If you selected HTTP Header in the previous step, then populate the Header Name field with the name of the header that you wish to use in your trigger.
- In the LOGICAL CONDITION dropdown menu, choose an operator. The operator options available in this dropdown are pre-defined based upon the criterion selected in the previous step.
Click to review the operator options
- Is / Is not - this means a strict match
- Contains / Not contains - a partial match to the rule string
- Greater than / Less than - applicable to number values only
- Is any of - a strict match to stated possible values
- Matches the expression - matches a regular expression
- Type a value into the FIELD VALUE text field. This is the value for the corresonding operator selected in the previous step.
- In the Field dropdown menu, select from the listed criteria.
- Optionally, click Add condition to add another condition.
- If you added another condition in the previous step, repeat steps 4a-4d to add the new condition parameters. You can add multiple conditions to a rule, but note that when adding more than one condition, all conditions are treated with the logical operator AND. This means that all listed conditions must be triggered before the associated action is performed. Optionally, to remove a condition that you do not want associated with your rule, click X beside the condition to be deleted.
- Optionally, repeat the previous two steps for as many conditions as you need.
- Now choose an action that is to be triggered by your condition(s). Choose from the following actions:
Click to review the actions available
- Deny access - access is denied to your website.
- Grant access - access is granted to your website.
- Use CAPTCHA - access is granted to your website, but only after successful completion of a CAPTCHA challenge.
- Redirect to: - regular access is denied and the traffic is redirected to either a particular page in your website, or another website page entirely. After selecting this action, you must provide the URL of the redirection target page.
- Limit request rate by: - access requests from the same source are restricted within the bounds set in the additional fields for this action. After selecting this action, you must state how many requests that you will allow within a stated time period.
- Place a check in the Active checkbox if you want your rule to be active immediately.
- Click OK to add your new rule.
- Enure that your new rule has been activated.
- At the top of the page, you should see a success banner with the text: Information: Blackwall Settings were saved. Web server configuration was applied.
- In the existing Custom Rules list, locate your new rule.
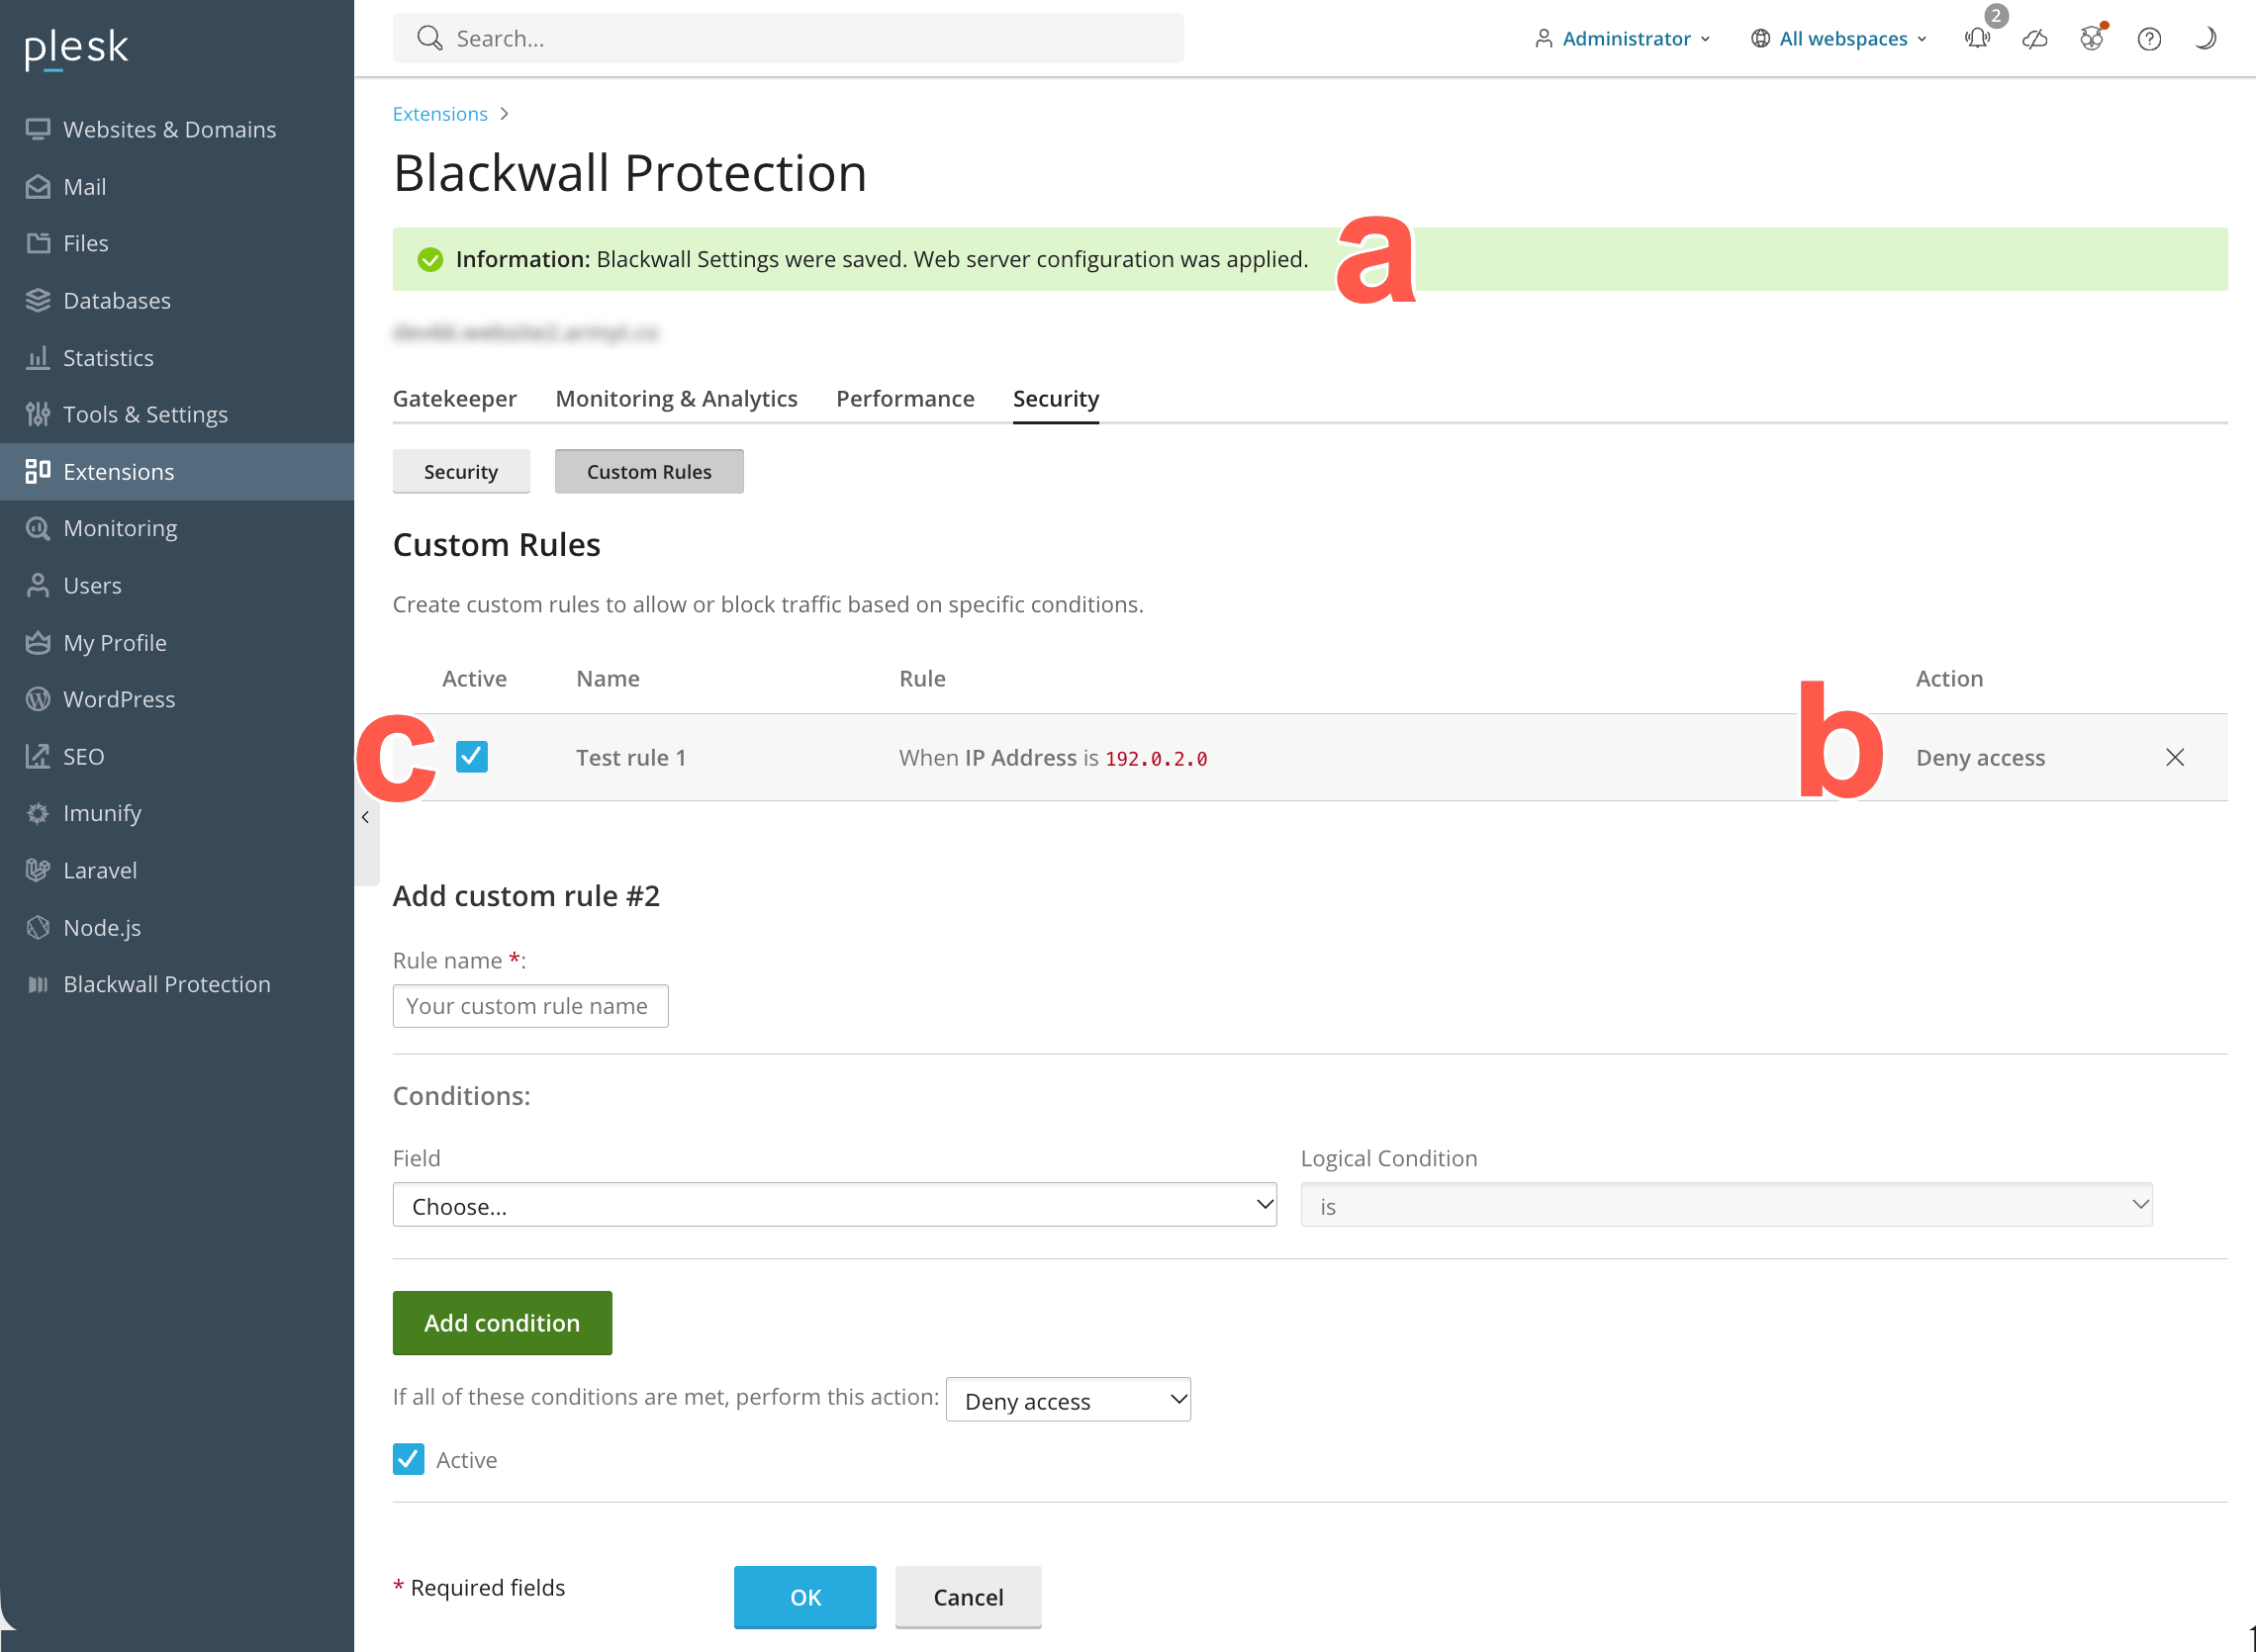
- Make sure that the rule activation checkbox is checked. In the future, you can also choose to uncheck this checkbox to deactivate the rule.
Once created, rules can not be edited. If you need to change a rule, add a new rule with the new configuration desired and then remove the old rule.
Note
For FIELD VALUE entry for step 5d and the Redirect to option for available actions in step 9, you can add URLs in two ways. You can:
- Add the URL as an absolute URL including the transfer protocol; e.g. http://anywebsite.com/any-page
- Alternatively, you can add the URL as a relative URL, so long as the URL is in the same website as the one for which you are creating a custom rule; e.g. /any-page. In effect, this is the same as using http://your-protected-website.com/any-page.